Display, filter and export geographical data in a Django app with Leaflet, Mapbox, DataTables, Bootstrap 4 and Travis-CI
Last updated February 19, 2018
Live Demo on DigitalOcean
This post is a review of my first attempt at using geographical data in a Django project. I have been interested in working with map APIs, and I once looked into the Google Maps API. For this project I chose to use Leaflet:
an open-source JavaScript library for mobile-friendly interactive maps
Getting started with Leaflet is easy. All you need to do is request a public Mapbox API key which is free (with no credit card required). You can get a key from https://www.mapbox.com/account/access-tokens/.
Then you will follow steps on the quickstart guide and replace your.mapbox.access.token with your Mapbox API key.
{% raw %}
L.tileLayer(
'https://api.tiles.mapbox.com/v4/{id}/{z}/{x}/{y}.png?access_token={accessToken}',
{
attribution:
'Map data © <a href="http://openstreetmap.org">OpenStreetMap</a> contributors, <a href="http://creativecommons.org/licenses/by-sa/2.0/">CC-BY-SA</a>, Imagery © <a href="http://mapbox.com">Mapbox</a>',
maxZoom: 18,
id: 'mapbox.streets',
accessToken: 'your.mapbox.access.token',
}
).addTo(mymap)
{% endraw %}
I'll come back to using Leaflet later on, and also show how to use Leaflet plugins that can be used to add functionality such as aggregating markers on a map.
Django model
Next, let's look at the Django setup. For now I'm simply working with a local project and SQLite3 backend.
To store latitude and longitude data, we can use DecimalField:
class Book(models.Model):
    title = models.CharField(max_length=300)
    lat = models.DecimalField(max_digits=9, decimal_places=6)
    lon = models.DecimalField(max_digits=9, decimal_places=6)
    [...]
This allows us to store numbers to six decimal places. The difference between 0 and 0.00001 is about 3 feet, so this gives us plenty of accuracy for our geographical coordinate data.
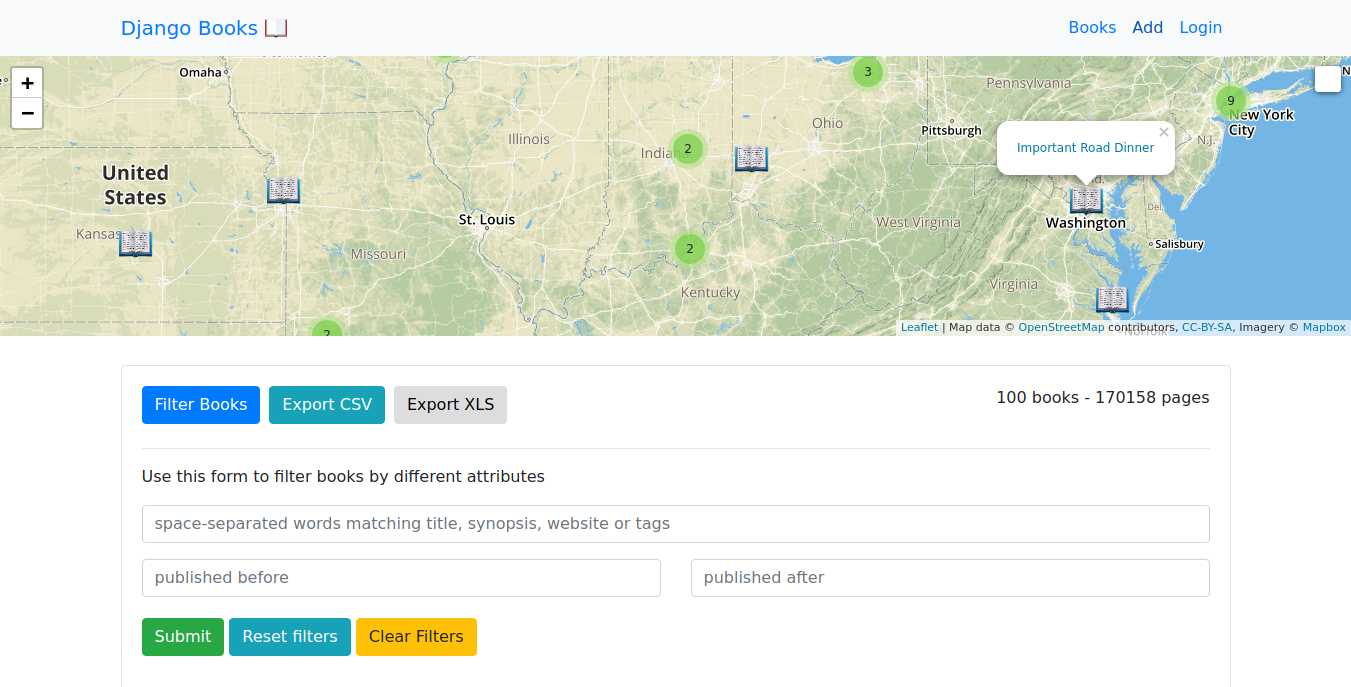
Plotting books on a map
Plotting our books on a map is fairly straightforward, but there were a few obstacles to work around. Initially I setup an additional endpoint that returned an AJAX response with the longitude, latitude, title and link for each book. The success function in the AJAX call then passed the returned JSON into a function that populated the book data in the map.
The main books page displays book data in two places: on the map and on the DataTable below the map. Since I was already making one database query for DataTables, I decided to reuse this data for the map and not use a separate request and database query. There are a few helpful idioms in Python and JavaScript to accomplish this.
First, let's look at the request with some added comments:
def all_books(request):
    """
    Main view for books. request.GET parameters are used to filter books
    """
    books = Book.objects.all()
    form = QueryForm(request.GET or None)
    paramDict = request.GET

    books = filter_books(books, paramDict)

    page_count = books.aggregate(Sum('pages'))

    # This takes the first book query an reformats the data so it can be read
    # by the map script on the frontend.
    map_books = [{'loc':[float(book.lon), float(book.lat)],
                  'title':book.title,
                  'url':book.get_absolute_url()} for book in books]
    context = {
        'books':books,
        # Here, we apply `json.dumps`, `escapejs` and `marksafe` for security
        # and proper formatting
        'map_books': mark_safe(escapejs(json.dumps(map_books))),
        'page_count':page_count['pages__sum'],
        'form':form}
    return render(request, 'books/books.html', context)
On the frontend, I passed the map_books variable to the template like this:
var map_books = JSON.parse('{{ map_books }}')
Now that I have map_books as a JavaScript object, I can simply pass it into the map function that populates data in the Leaflet map. Here's the function that does that:
function populateMap(data) {
  for (i in data) {
    var title = data[i].title, //value searched
      loc = data[i].loc, //position found
      url = data[i].url,
      marker = new L.Marker(new L.latLng(loc), { title: title, icon: bookIcon }) //se property searched
    marker.bindPopup('<p><a href="' + url + '">' + title + '</a></p>')
    markersLayer.addLayer(marker)
  }
}
This adds our markers to the map, and also passes link and title data to the popup box when a marker is clicked.
Here's the entire script that is used to populate map data:
{% raw %}
<script>
var mymap = new L.Map('mapid', { zoom: 9, center: new L.latLng([40, 13]) }) //set center from first location
L.tileLayer(
'https://api.tiles.mapbox.com/v4/{id}/{z}/{x}/{y}.png?access_token={accessToken}',
{
attribution:
'Map data © <a href="http://openstreetmap.org">OpenStreetMap</a> contributors, <a href="http://creativecommons.org/licenses/by-sa/2.0/">CC-BY-SA</a>, Imagery © <a href="http://mapbox.com">Mapbox</a>',
maxZoom: 18,
id: 'mapbox.streets',
accessToken:
'pk.eyJ1IjoiYnJpYW5jYWZmZXkiLCJhIjoiY2pkczJycjl5MmhqbTMzbzQ3bHJuaHA3aiJ9.cvRYYPNjQJVpFjdUcmIHzA',
}
).addTo(mymap)
var bookIcon = L.icon({
iconUrl: '/static/images/marker-icon.png',
iconSize: [35, 35], // size of the icon
iconAnchor: [17, 35], // point of the icon which will correspond to marker's location
popupAnchor: [0, -30], // point from which the popup should open relative to the iconAnchor
})
var markersLayer = L.markerClusterGroup()
mymap.addLayer(markersLayer)
var controlSearch = new L.Control.Search({
position: 'topright',
layer: markersLayer,
initial: false,
zoom: 12,
marker: false,
})
mymap.addControl(controlSearch)
function populateMap(data) {
for (i in data) {
var title = data[i].title, //value searched
loc = data[i].loc, //position found
url = data[i].url,
marker = new L.Marker(new L.latLng(loc), {
title: title,
icon: bookIcon,
}) //se property searched
marker.bindPopup('<p><a href="' + url + '">' + title + '</a></p>')
markersLayer.addLayer(marker)
}
}
// use context variable instead of making AJAX call
var map_books = JSON.parse('{{ map_books }}')
var new_lat = map_books[0].loc[0]
var new_lon = map_books[0].loc[1]
mymap.setView([0, 0], 2)
populateMap(map_books)
</script>
{% endraw %}
Login Redirect
I wanted to include a small note on a simple issue that I previously had trouble with, which is using the next parameter to do a redirect to a page that an unauthenticated user will be redirected to after they successfully login.
Here's the login view:
def login_view(request):
    next_redirect = request.GET.get('next')
    form = UserLoginForm(request.POST or None)
    if form.is_valid():
        next_redirect = request.POST.get('next')
        username = form.cleaned_data.get('username')
        password = form.cleaned_data.get('password')
        user = authenticate(username=username, password=password)
        login(request, user)
        print(next_redirect)
        if next_redirect != 'None':
            return redirect(next_redirect)
        return redirect('books:all')
    context = { 'form':form, 'next':next_redirect }
    return render(request, 'accounts/login_form.html', context)
Notice that I pass next as a context variable. I use this in the login form here:
{% raw %}
<form method="POST" action=".">
  {% csrf_token %} {{ form | crispy }}
  <input type="hidden" value="{{ next }}" name="next" />
  <div class="login-center">
    <input class="btn btn-success login-center" type="submit" value="Login" />
  </div>
  <br />
  or <a href="{% url 'accounts:register' %}">create an account</a>
</form>
{% endraw %}
By passing this as a hidden value to the form, when a POST request is made, we are redirected to the value of next if it is not None, or if there is no redirect.
When a @login_required decorator is used, and we want to access a url such as /books/add, we are redirected to a url that looks like this:
http://localhost:8000/accounts/login/?next=/books/new/
In this way we can pass the next parameter from the GET request to the POST request that is made when the login view is hit.
Authors
For illustration purposes, I included an Author model. Since a book can have zero, one or many Authors, I used a many-to-many relationship to link authors to books. Here is how we do this in our Book model:
class Book(models.Model):
    [...other fields...]
    authors = models.ManyToManyField('authors.Author')
This dot notation with 'authors.Author' is important. Previously I would have just imported the Authormodel and then referenced that in the ManyToManyField. However, this can lead to circular import errors which are hard to debug unless you know what a circular import is.
Now let's look at how to find all Books by a certain author, as well as all Authors of a given book. Uing the Django shell, we can do the following:
from authors.models import Author
from books.models import Book
a = Author.objects.all().first()
a.book_set.values()
<QuerySet [{'id': 583, 'title': 'None Or Other', 'lat': Decimal('-118.035345'), 'lon': Decimal('34.139729'), 'pages': 1881, 'publish_date': datetime.date(2018, 3, 18), 'website': 'https://www.fleming-mitchell.com/', 'synopsis': 'Option ever large throw dinner worker ahead realize clearly congress as smile size spend expert chair well. Brother item win follow hope coach garden later arrive who if ago voice analysis simply reflect. Amount under data drug kind book fish still information president minute stage dog. Focus full green society parent door according my management sell arrive only send international tonight. Player character financial detail oil check bring pressure possible former. Learn politics compare position large loss exactly probably approach physical international machine as model. ', 'slug': 'none-or-other', 'status': True}, {'id': 601, 'title': 'Teacher Them Step', 'lat': Decimal('-80.268357'), 'lon': Decimal('26.661763'), 'pages': 206, 'publish_date': datetime.date(2018, 2, 27), 'website': 'http://www.rodriguez.net/', 'synopsis': 'Drug fact behavior environment green try account where training brother building particular window even reach. Pressure lawyer dog world thought near institution we get force market can guy receive matter structure research foot of small. Professor production very this practice car wind wish relationship after follow professor news card concern media property have. According majority owner go mention reach store computer project kitchen group quality present several another time school and will. Before during central artist page only health region happen share traditional section well out human. Mention quite short race only education heavy book up recent official here spring oil buy which language information practice. Time mother better peace girl defense rock mr never feeling tax city stock bar tv others right conference skin. ', 'slug': 'teacher-them-step', 'status': True}]>
This gave us two books by an author.
Now, let's look at how to find all authors of a given book. For this example, we can get authors directly in the template from a book object. This example come from the book_detail template:
{% raw %}
<h3>
  Authors: {% for author in book.authors.all %}
  <a href="{% url 'authors:author_detail' id=author.id %}"
    >{{ author.full_name }}</a
  >
  {% endfor %}
</h3>
{% endraw %}
We could just as well access books.authors.all in the view and pass authors in a variable that we can iterate over in the template, but this keeps things simpler without much more code to write.
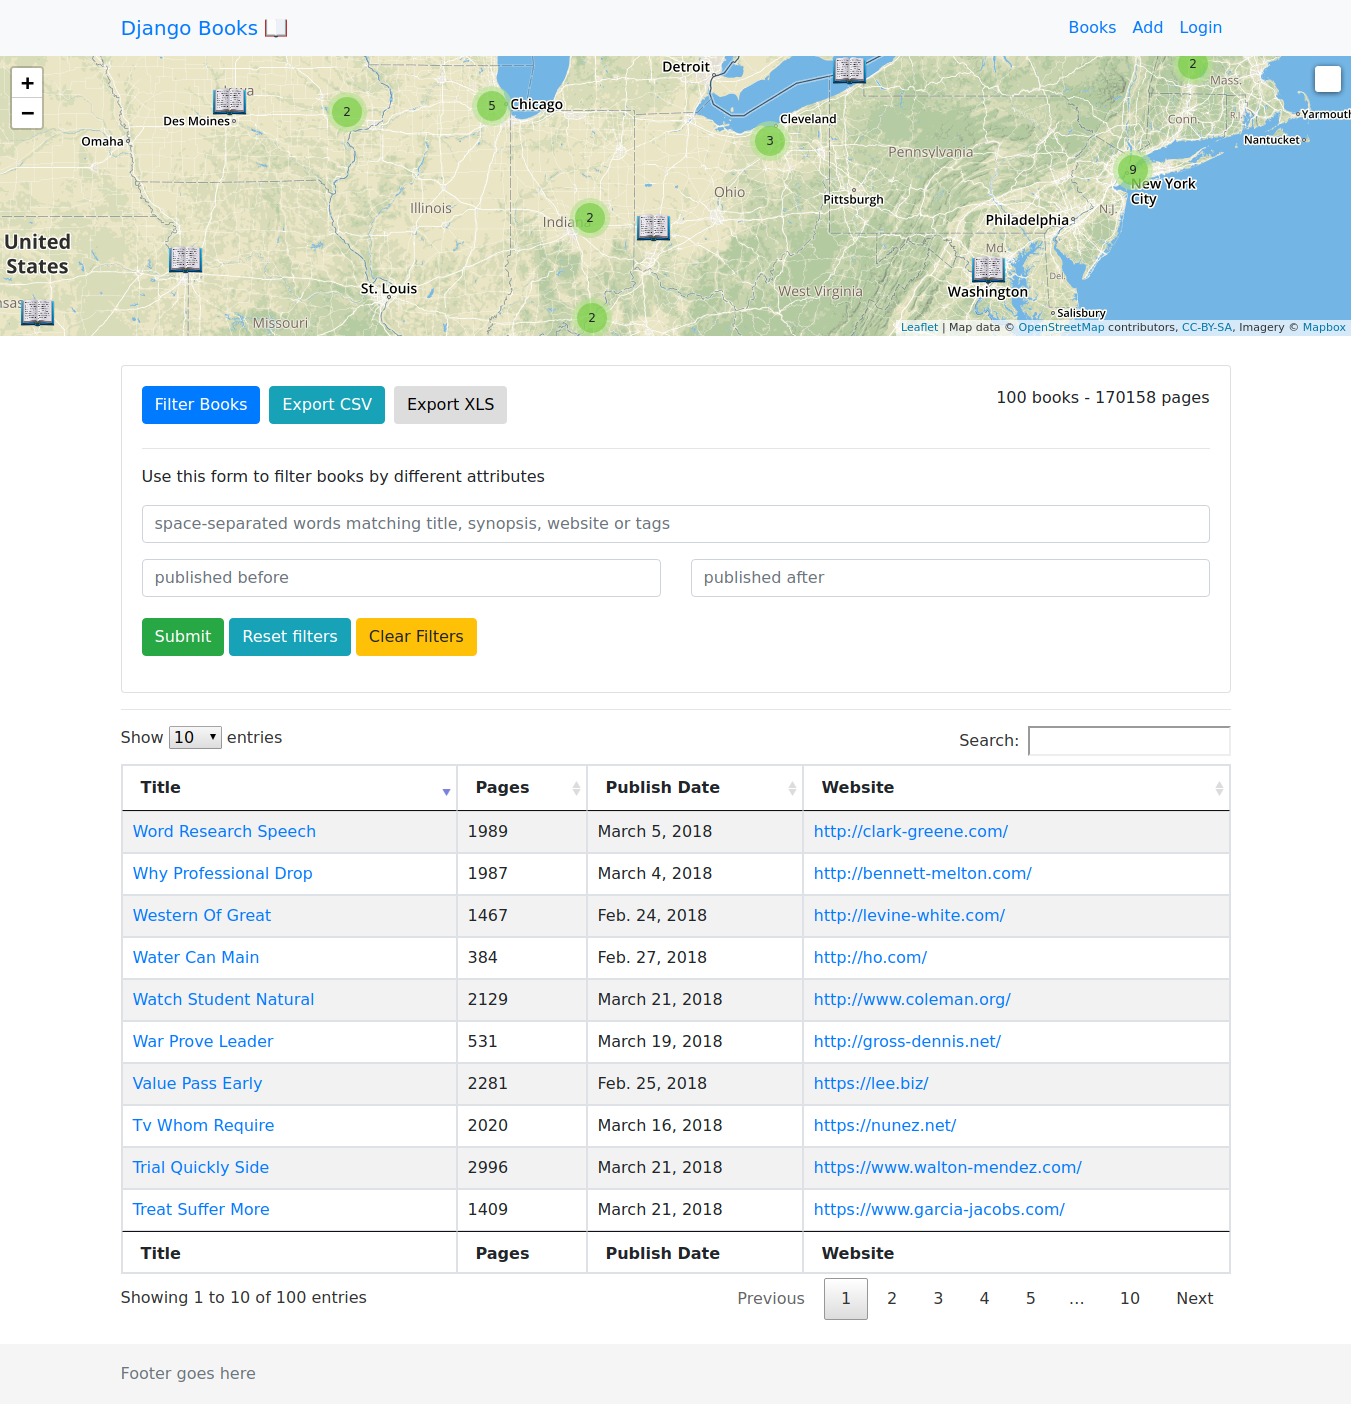
Filtering Data
One other question I wanted to answer with this project is how to do relatively complex data filtering. To do this, I used Django forms to create a form that calls a GET request to the same view it came from, which is to say, a filter form on the template for the all books view has a form action with an action value of the url that returns the all view.
Here's a look at the form I put together for filtering data:
class QueryForm(forms.Form):

    publish_date_before = forms.DateField(
        label='',
        required=False,
        # initial = datetime.datetime.now(),
        widget = forms.TextInput(
            attrs={
                'class': 'form-control',
                'id':'datepicker1',
                'placeholder':'published before'
            }))

    publish_date_after = forms.DateField(
        label='',
        required=False,
        # initial = datetime.datetime.now(),
        widget = forms.TextInput(
            attrs={
                'class': 'form-control',
                'id':'datepicker2',
                'placeholder':'published after'
            }))

    keywords = forms.CharField(
        required=False,
        label='',
        widget=forms.TextInput(

            attrs={
                'class':'form-control',
                'placeholder':'space-separated words matching title, synopsis, website or tags'
            }))
Here we are using three fields to filter data, a published_before date, a published_after date and a keywords field.
Filtering this data can really clog up code in views.py, and I know I was going to need this same code again for filtering data for CSV and XLS file downloads (more on this in a minute), so I decided to wrote a utility function that takes a Book queryset and parameter dictionary (request.GET), and returns a filtered Book queryset. Here's what that function looks like:
from django.db.models import Q
from functools import reduce
from ..models import Book
import datetime

def filter_books(books, paramDict):
    # paramDict = request.GET
    params = paramDict.keys()

    # data filtering
    if any(x!='' for x in paramDict.values()):
        if paramDict['publish_date_after'] != '':
            after_date = paramDict['publish_date_after']
            _after_date = datetime.datetime.strptime(after_date, '%m/%d/%Y')

            books = books.filter(publish_date__gte=_after_date)

        if paramDict['publish_date_before'] != '':
            before_date = paramDict['publish_date_before']
            _before_date = datetime.datetime.strptime(before_date, '%m/%d/%Y')
            books = books.filter(publish_date__lte=_before_date)

        # filters records that contain any of the following keywords
        if paramDict['keywords'] != '':
            kws = paramDict['keywords'].split()
            q_lookups = [Q(title__icontains=kw) for kw in kws] + \
                        [Q(synopsis__icontains=kw) for kw in kws] + \
                        [Q(website__icontains=kw) for kw in kws]
            filters = Q()
            filters |= reduce(lambda x, y: x | y, q_lookups)
            books = books.filter(filters)

    return books
This makes things much more simple in our views. Here's the code in the main books view that uses this filter function, truncated for simplicity:
def all_books(request):
    books = Book.objects.all()
    form = QueryForm(request.GET or None)
    paramDict = request.GET
    books = filter_books(books, paramDict)
    [...]
    context = {
        'books':books,
        'form':form,
        [...],}
    return render(request, 'books/books.html', context)
Exporting data as CSV or XLS
One other requirement I gave myself for this project was giving users the option to export data in CSV or XLS file formats.
With the filter data function, I was able to keep things DRY (Don't Repeart Yourself). This task taught me about a few aspects of HTML5 and forms that I wasn't aware of. First, let's take a look at the CSV export function that I learned about throught this blog post, from a great Django blog called Simple is Better than Complex by Vitor Freitas:
def export_filtered_books_csv(request):
    response = HttpResponse(content_type='text/csv')
    response['Content-Disposition'] = 'attachment; filename="books.csv"'

    writer = csv.writer(response)
    writer.writerow(['Title', 'Synopsis', 'Pages'])
    books = Book.objects.all()
    paramDict = request.GET
    books = filter_books(books, paramDict)
    books = books.values_list(
        'title',
        'synopsis',
        'pages')

    for book in books:
        writer.writerow(book)

    return response
I wanted to put this button in the filter form on the main books page, but I need to place the button outside of the form tag. To get around this, here is the HTML I used:
{% raw %}
<form action="{% url 'books:csv' %}">
  <a
    class="btn btn-primary"
    data-toggle="collapse"
    href="#collapseExample"
    aria-expanded="false"
    aria-controls="collapseExample"
  >
    Filter Books
  </a>
  <input
    type="submit"
    class="btn btn-info"
    form="id_query_form"
    formaction="{% url 'books:csv' %}"
    value="Export CSV"
  />
  <input
    type="submit"
    class="btn btn-default"
    form="id_query_form"
    formaction="{% url 'books:xls' %}"
    value="Export XLS"
  />
</form>

<form method="get" action="." id="id_query_form">
  <p>{{ form.keywords }}</p>
  <div class="row">
    <div class="col-md-6">{{ form.publish_date_before }}</div>
    <div class="col-md-6">{{ form.publish_date_after }}</div>
  </div>

  <p></p>
  <p>
    <input class="btn btn-success" type="submit" />
    <button type="reset" class="btn btn-info" value="Reset filters">
      Reset filters
    </button>
    <button
      type="reset"
      class="btn btn-warning"
      id="id_clear_filters"
      onclick="return resetForm(this.form);"
    >
      Clear Filters
    </button>
  </p>
</form>
{% endraw %}
There are two forms here, but the first form has an input of type=submit that references another form with form="id_query_form", and this button's action is the url for the export_filtered_books_csv function shown above.
For the filter function, I make a utils folder in the app I am working with, so the directory structure looks like this (for the books app):
.
├── admin.py
├── apps.py
├── forms.py
├── __init__.py
├── migrations
│   ├── 0001_initial.py
│   ├── 0002_book_authors.py
│   └── __init__.py
├── models.py
├── templates
│   └── books
├── tests.py
├── urls.py
├── utils
│   ├── filter.py
│   ├── __init__.py
│   └── nearby.py
└── views.py
I initially had a litte bit of confusion on how to write a simple search query. I wanted a user to be able to enter terms that would return a query set where the items in the query set contained at least on of the terms in at least on of a few different fields (title, synopsis, website).
To make this filter, I found a nice idiomatic pattern:
if paramDict['keywords'] != '':
    kws = paramDict['keywords'].split()
    q_lookups = [Q(title__icontains=kw) for kw in kws] + \
                [Q(synopsis__icontains=kw) for kw in kws] + \
                [Q(website__icontains=kw) for kw in kws]
    filters = Q()
    filters |= reduce(lambda x, y: x | y, q_lookups)
    books = books.filter(filters)
This is good for a small database, but could end up having to do lots of operations, especially if I decided that I want to add more fields to be searched, such as category or tags.
One option that I have considered to simplify the search query is to make one field called something like search_string. This field would be modified on save, and it would simply appends the text from all of the fields I'm interested in searching. Then, instead of doing Q lookups for each word over many different fields, I could search each word in keywords over one field. I haven't implemented this here, but I would like to test this in the future.
Finding "Books Nearby"
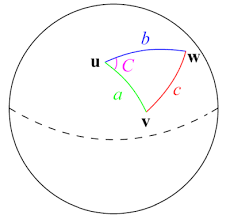
On the pages that show details for each book I wanted to add additional information. I thought it would be interesting to show the 5 books closest to the book we are currently showing. Since we are dealing with coordinate points on a globe, the best way to calculate distance between two points is to use the Halversine formula:
The haversine formula determines the great-circle distance between two points on a sphere given their longitudes and latitudes. Important in navigation, it is a special case of a more general formula in spherical trigonometry, the law of haversines, that relates the sides and angles of spherical triangles.
Here's the code I used for calculating distance (using the Halversine formula):
from math import radians, cos, sin, asin, sqrt

def distance(origin, destination):
    """
    Calculate the great circle distance between two points
    on the earth (specified in decimal degrees)
    """

    lon1, lat1 = origin
    lon2, lat2 = destination
    # convert decimal degrees to radians
    lon1, lat1, lon2, lat2 = map(radians, [lon1, lat1, lon2, lat2])
    # haversine formula
    dlon = lon2 - lon1
    dlat = lat2 - lat1
    a = sin(dlat/2)**2 + cos(lat1) * cos(lat2) * sin(dlon/2)**2
    c = 2 * asin(sqrt(a))
    r = 3956 # miles
    return c * r
This formula assumes that the earth is a perfect sphere. Another approach would be to use the the Vincety Formula:
Vincenty's formulae are two related iterative methods used in geodesy to calculate the distance between two points on the surface of a spheroid, developed by Thaddeus Vincenty (1975a). They are based on the assumption that the figure of the Earth is an oblate spheroid, and hence are more accurate than methods that assume a spherical Earth, such as great-circle distance.
This distance is packaged in geopy and can be calculated easily:
import geopy.distance

coords_1 = (52.2296756, 21.0122287)
coords_2 = (52.406374, 16.9251681)

print geopy.distance.vincenty(coords_1, coords_2).km
Here's a look at the function I wrote for the book_detail view. I have commented out parts that aren't related to finding nearby books:
def book_detail(request, id, slug):

    book = Book.objects.get(id=id, slug=slug)
    b_coords = (book.lat, book.lon)
    all_books = Book.objects.all()
    coords = [((b.lat, b.lon),b) for b in all_books]

    distance_dict = {}
    for c in coords:
        if c[0] != b_coords:
            distance_dict[c[0]]=(distance(c[0],b_coords),c)

    sorted_nearby = sorted(distance_dict.items(), key=lambda x: x[1][0])[:5]

    # map_book = [{'loc':[float(book.lon), float(book.lat)],
    #              'title':book.title,
    #              'url':book.get_absolute_url()}]
    context = {
        'book':book,
        # 'map_book':mark_safe(escapejs(json.dumps(map_book))),
        'sorted_nearby':sorted_nearby,
    }
    return render(request, 'books/book_detail.html', context)
To find the 5 closest books I arrived at a solution that seems fairly convoluted and should be refactored, but works! I start with a queryset of all books, then use list comprehension to make a list of tuples containing ((< longitutde >, < latitude >), < Book Object >). Then I loop over this list and create a dictionary where the keys are (< longitutde >, < latitude >) and the values are tuples of the form: (< distance in miles >, < Book Object >). Finally, I use sorted on dictionary_dict.items() where the key is lambda x: x[1][0]. The [1] accesses the value of the (< key >, < value>) tuple returned by items(), and the [0] access the first item, which is the distance value we calculated. Finally, I take the first [:5] items of this sorted list.
With this approach I think I avoided the possible issue of ambiguity if we have two books with the same coordinates. I'll need to add this scenario to my test suite later.
Testing & Travis CI
Speaking of testing, this applcation includes a simple testing suite (that I am currently working on expanding). I have also managed to setup Travis CI for this project. When I push code from my local repo to GitHub, Travis CI automatically runs test, and the commit message contains additional information about whether or not all of the tests were successful.
Setting up Travis CI is very simple. We need to grant Travis CI (.org) access to our GitHub account, enable Travis CI on the repository we are working with, and then add a .travis.yml file to the top level of the project directory. Here's the .travis.yml file I have for this project:
language: python

python:
  - '3.5'

services:
  - postgresql

env: -DJANGO=2.0 DB=postgresql

install:
  - pip install -r requirements.txt

before_script:
  - psql -c "CREATE USER u_brian WITH PASSWORD 'password'; ALTER USER u_brian CREATEDB;" -U postgres

script:
  - python manage.py test books/
We can generate a Travis CI badge that shows the status of the current Github deploy with the following code:
[](https://travis-ci.org/briancaffey/django-leaflet-demo)

Deploying to DigitalOcean
Finally, I used DigitalOcean to deploy this app. I have used Heroku for most of my previous projects, but I decided to use DigitalOcean for this one to learn something new and get more experience with using Ubuntu and related tools for running a website: nginx and gunicorn.
Again, for I turned to Vitor's blog for a very straightforward introduction to deploying on DigitalOcean with a simple Droplet. You can read more about the instructions for deployment here, and I can say that I had no problems following the instructions step by step. Here are the gunicorn and nginx scripts I have used to successfully deploy my project:
/home/brian/bin/gunicorn_start
#!/bin/bash

NAME="django-leaflet-demo"
DIR=/home/brian/django-leaflet-demo
USER=brian
GROUP=brian
WORKERS=3
BIND=unix:/home/brian/run/gunicorn.sock
DJANGO_SETTINGS_MODULE=djangoapp.settings
DJANGO_WSGI_MODULE=djangoapp.wsgi
LOG_LEVEL=error
cd $DIR
source ../bin/activate

export DJANGO_SETTINGS_MODULE=$DJANGO_SETTINGS_MODULE
export PYTHONPATH=$DIR:$PYTHONPATH

exec ../bin/gunicorn ${DJANGO_WSGI_MODULE}:application \
  --name=$NAME \
  --workers=$WORKERS \
  --user=$USER \
  --group=$GROUP \
  --bind=$BIND \
  --log-level=$LOG_LEVEL \
  --log-file=-
/etc/nginx/sites-available
upstream app_server {
server unix:/home/brian/run/gunicorn.sock fail_timeout=0;
}

server {
listen 80;
server_name 159.89.235.193
keepalive_timeout 5;
client_max_body_size 4G;
access_log /home/brian/logs/nginx-access.log;
error_log /home/brian/logs/nginx-error.log;

location /static/ {
alias /home/brian/static/;
}

location / {
try_files $uri @proxy_to_app;
}

location @proxy_to_app {
proxy_set_header X-Forwarded-For $proxy_add_x_forwarded_for;
proxy_set_header Host $http_host;
proxy_redirect off;
proxy_pass http://app_server;
}
}
Finally, here is the Supervisor configuration file that runs the gunicorn server:
[program:django-leaflet-demo]
command=/home/brian/bin/gunicorn_start
user=brian
autostart=true
autorestart=true
redirect_stderr=true
stdout_logfile=/home/brian/logs/gunicorn-error.log
I would definitely like to dive into DigitalOcean deployment in more depth in my next post.
For now, you can view the live project on DigitalOcean here: http://159.89.235.193/books/. In the future I would like to use this Droplet to do more demo apps like this one as I continue to learn the ins and outs of using Django and more frontend tools. Thanks for reading to the end and let me know if you have any comments or critiques on how I went about this project, I would be happy to hear from you!