
On-demand, serverless Valheim server setup with AWS CDK, Discord Interactions and GitLab CI
Last updated March 18, 2021
Here's a link to the GitLab repo I'll be referencing in this article: https://gitlab.com/briancaffey/valheim-cdk-discord-interactions
This is an in-depth technical article about running an on-demand, dedicated server for Valheim using Amazon Web Services controlled with Discord Slash Commands, a new part their Interactions API that is currently in beta. Valheim is an open-world online multiplayer survival game loosely based on Norse mythology that has blown up recently.
My main goal with this project was to find an inexpensive way of running a server given how my friends and I play the game, which is typically a few times a week in the evenings. Some combination of 4 of us will start playing, and we drop in and out between walking dogs, cooking, etc. When playing, we all jump on a dedicated voice channel on our group's Discord.
Before setting up a dedicated server, our game's world state was stored on files that lived on one of our computers, and that computer needed to be running the game server in order for anyone to connect. Sending files around would be possible, but would quickly become tedious. There are lots of services that offer dedicated servers for Valheim, as well as many technical guides and channels on the official Valheim Discord server to support the use of dedicated servers. I wanted to see if I could set up a server myself on AWS using CDK, or Cloud Development Kit. CDK is an Infrastructure as Code (IaC) tool that allows you to define, deploy and update AWS infrastructure with popular programming languages such as Python, Typescript, Java, etc.
cdk-valheim construct on GitHub
The best part of CDK is that it enables the creation high-level, reusable constructs that can be published to software registries like npm and PyPI. Developers can import and use these constructs in their own CDK code. A quick google search for "cdk valheim" turned up a few results. cdk-valheim seems like the best option for what I was looking for. This project uses ECS, a container orchestration tool from AWS that I have experience using with web applications and EFS for persistent file storage. Although it is written in Typescript, I can still use the construct in my preferred programming language (Python) without any extra effort or configuration. This is thanks to the jsii. From https://github.com/aws/jsii:
jsiiallows code in any language to naturally interact with JavaScript classes. It is the technology that enables the AWS Cloud Development Kit to deliver polyglot libraries from a single codebase!
Here's an overview of the cdk-valheim construct:
- Scheduled scaling of an ECS service using AWS Fargate (a serverless compute engine for containers)
- Elastic File System (EFS) file system mounted into the Fargate Task container of our ECS service
- Optional automated backups of the EFS file system using AWS Backup
Discord Interactions and Slash Commands
Scheduled ECS scaling is nice, but we don't always know when we will be able to play together, so it is not the best way to minimize infrastructure costs. My plan was to set the ECS service to an initial task count of zero and then let any of us set the number of tasks to either zero or one through a Discord Slash Command. A Slash Command allows you to interact with a discord bot by typing / and then tabbing through to the option we want, such as /valheim server start or /valheim server status.
Invoking a Slash Command from Discord sends a POST request from Discord to a webhook URL that we have to provide. To handle the webhook, one simple and inexpensive approach is to use API Gateway and a Lambda function that serves a Flask app. The Flask app can then use boto3 (which is included in the Lambda execution environment) to call update_service or describe_services to scaled the ECS task's desiredCount based on the slash command options and sub options.
The function that handles the webhook POST request when the sub-command is status queries AWS for the number of ECS tasks in our service that are desired, running and pending and then sends back a message that will be displayed to the user who sent the command. When the sub-command is start or stop, the desiredCount is either set to 1 or 0.
Here's an overview of the server setup and how Discord Slash Commands can be used to control the server:
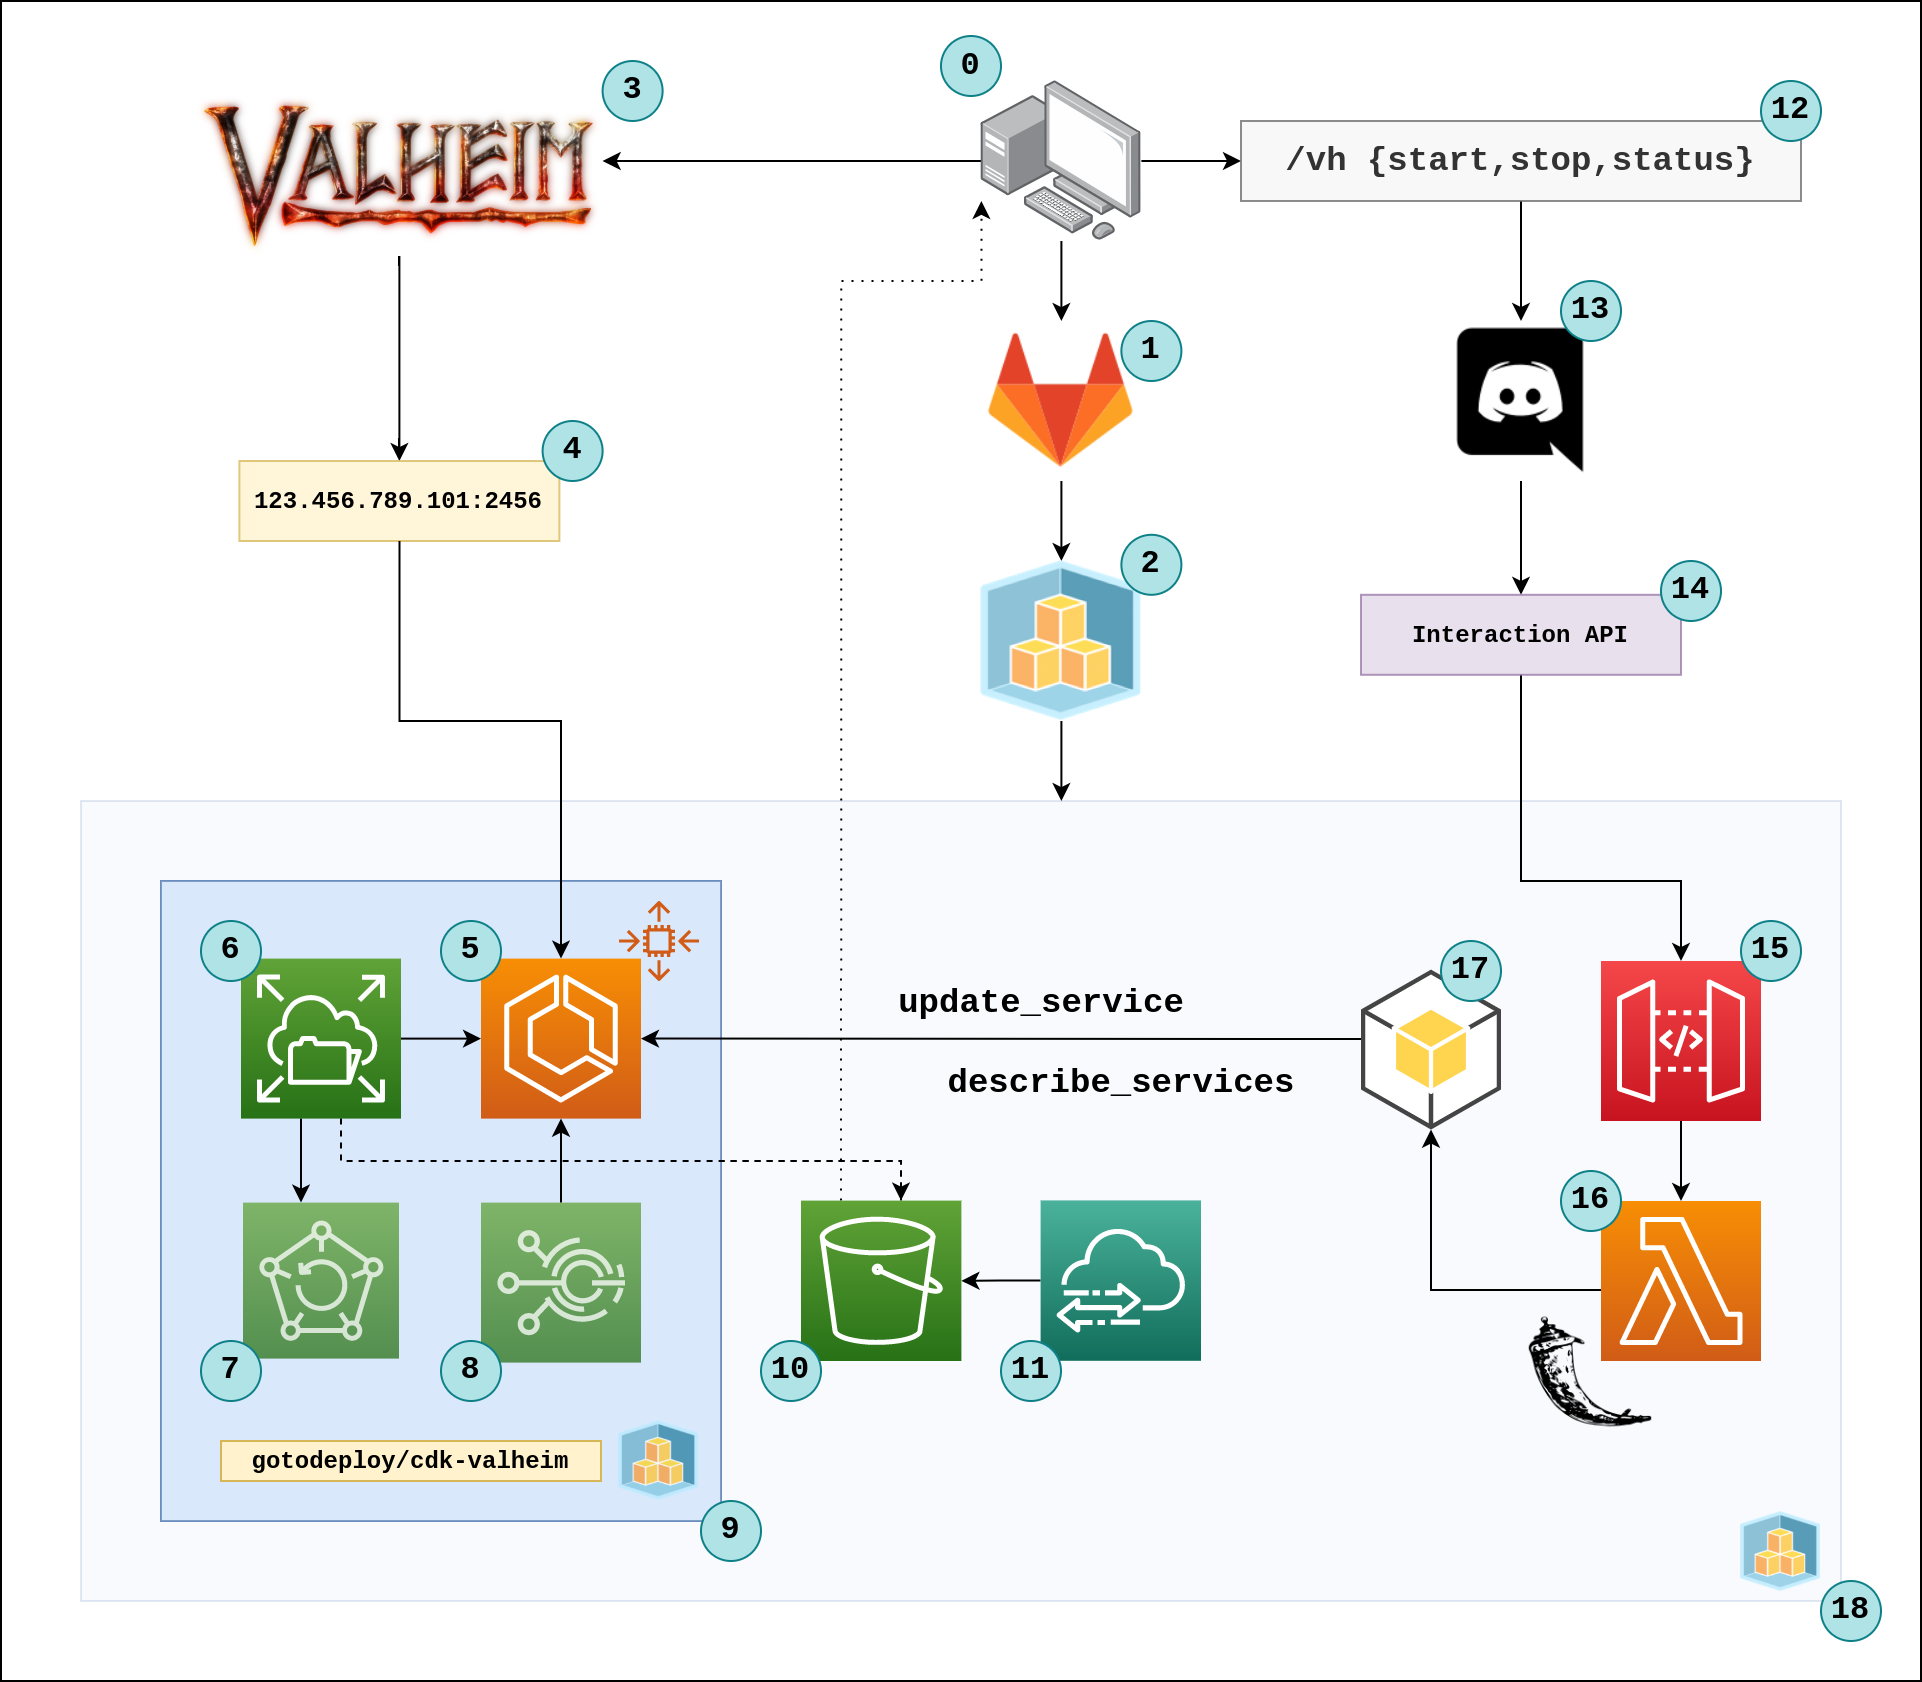
I'll cover each of the steps labelled in this diagram at the end of the article. The rest of the article will provide detailed instructions for how to set everything up. I won't be going over AWS account setup or Discord server setup.
How to set up the Discord developer application and Interaction
First, you need to be the admin of a Discord server. Once you create the server, go to Server Settings > Widget and take note of the Server ID. This is also known as the Guild ID.
Then go to https://discord.com/developers/applications and create an application. Under General Information, make note of the public key (the application ID). Put these values in a file that will be .gitignored called .env:
export GUILD_ID=123456789
export APPLICATION_ID=abc123
We will use this file later when registering the Interaction.
Next go to the OAuth2 tab and select the bot and applications.commands permissions. This will generated an OAuth2 authorization link. Copy the link and open it in a browser. We will see an error:
OAuth2 application does not have a bot
Configure a bot for our Discord application
Next, got to the Bot tab and click the Add Bot button.
Adding a bot user gives your app visible life in Discord. However, this action is irrevocable! Choose wisely.
Turn off the Public Bot option and save changes.
Get the bot token by clicking on Click to Reveal Token, and add this to .env:
export BOT_TOKEN=abc.xyz.123
Now go back to the OAuth2 tab and select the bot and applications.commands permissions again, copy the link and open it. Select the server that you want to add this application to. You should see a captcha, and then a message that says Authorized. You should also see a message from your discord server that the bot has joined the server.
Create the Interaction
Now we will set up the Interaction. Currently the only way to set up the interaction is through an HTTP POST request. This Python script sets up our Interaction:
"""
https://discord.com/developers/docs/interactions/slash-commands#registering-a-command
"""

import os

import requests

APPLICATION_ID = os.environ.get("APPLICATION_ID")
GUILD_ID = os.environ.get("GUILD_ID")
BOT_TOKEN = os.environ.get("BOT_TOKEN")

url = f"https://discord.com/api/v8/applications/{APPLICATION_ID}/guilds/{GUILD_ID}/commands"

json = {
    "name": "vh",
    "description": "Start, stop or get the status of the Valheim server",
    "options": [
        {
            "name": "valheim_server_controls",
            "description": "What do you want to do?",
            "type": 3,
            "required": True,
            "choices": [
                {
                    "name": "status",
                    "value": "status"
                },
                {
                    "name": "start",
                    "value": "start"
                },
                {
                    "name": "stop",
                    "value": "stop"
                }
            ]
        },
    ]
}

headers = {
    "Authorization": f"Bot {BOT_TOKEN}"
}

if __name__ == "__main__":
    r = requests.post(url, headers=headers, json=json)
    print(r.content)
Before running this command, source the .env file:
source .env
Then run the script:
python3 register_bot.py
You should see this response:
b'{"id": "XXXXXXXXXXXXXX", "application_id": "XXXXXXXXXXXXXX", "name": "vh", "description": "Start, stop or get the status of the Valheim server", "version": "XXXXXXXXXXXXXX", "default_permission": true, "guild_id": "XXXXXXXXXXXXXX", "options": [{"type": 3, "name": "valheim_server_controls", "description": "What do you want to do?", "required": true, "choices": [{"name": "status", "value": "status"}, {"name": "start", "value": "start"}, {"name": "stop", "value": "stop"}]}]}'
Now, when you type / in any channel on the Discord server that you authenticated the bot, you should see the vh command at the top of the list of autocomplete options.
If we run any of these commands, we should see a response saying:
This interaction failed
This is because we have not configured an Interactions Endpoint URL under the General Information section of our Discord Application's admin page (https://discord.com/developers/applications/).
Setting up the Interactions Endpoint URL for our Slash Command
In order for our Slash Command to do anything, we need to set up URL that Discord will POST the Interaction event data to, including information such as who sent the Interaction, what channel it was sent on, what options were used, etc. You can see an example of the event payload here on the Discord developer documentation:
{
    "type": 2,
    "token": "A_UNIQUE_TOKEN",
    "member": {
        "user": {
            "id": 53908232506183680,
            "username": "Mason",
            "avatar": "a_d5efa99b3eeaa7dd43acca82f5692432",
            "discriminator": "1337",
            "public_flags": 131141
        },
        "roles": ["539082325061836999"],
        "premium_since": null,
        "permissions": "2147483647",
        "pending": false,
        "nick": null,
        "mute": false,
        "joined_at": "2017-03-13T19:19:14.040000+00:00",
        "is_pending": false,
        "deaf": false
    },
    "id": "786008729715212338",
    "guild_id": "290926798626357999",
    "data": {
        "options": [{
            "name": "cardname",
            "value": "The Gitrog Monster"
        }],
        "name": "cardsearch",
        "id": "771825006014889984"
    },
    "channel_id": "645027906669510667"
}
This POST request also includes some special headers used for security that we will need to do validation with our handling function. This part can be handled with a decorator provided by the discord-interactions package on PyPI, but we will need to add some additional configuration to our API Gateway endpoint since these headers will not be passed through the lambda by default.
Setting up AWS infrastructure with CDK
Let's start a CDK project in a blank repository that will define our infrastructure, Lambda functions and CI/CD pipeline with GitLab CI. Make sure that you have the aws-cdk CLI installed globally:
npm i -g aws-cdk
Then start a CDK project in a subdirectory called cdk with:
mkdir cdk && cd cdk && cdk init app --language=python
Add CDK project dependencies
The next step is to add all of the dependencies to our CDK project that we will use in this project. In setup.py add the following:
    install_requires=[
        "aws-cdk.core==1.92.0",
        "aws-cdk.aws_applicationautoscaling==1.92.0",
        "aws-cdk.aws_datasync==1.92.0",
        "aws-cdk.aws_lambda==1.92.0",
        "aws-cdk.aws_s3==1.92.0",
        "aws-cdk.aws_apigateway==1.92.0",
        "cdk-valheim==0.0.16",
    ],
Next we can add the CDK construct for ValheimWorld in the cdk_stack.py file that was generated in our project as well as the imports for the packages we included in setup.py:
from aws_cdk import core as cdk

from aws_cdk import (
    core,
    aws_datasync as datasync,
    aws_iam as iam,
    aws_lambda as _lambda,
    aws_apigateway as apigw,
    aws_applicationautoscaling as appScaling,
    aws_s3 as s3,
)
from cdk_valheim import ValheimWorld, ValheimWorldScalingSchedule


class CdkStack(cdk.Stack):

    def __init__(self, scope: cdk.Construct, construct_id: str, **kwargs) -> None:
        super().__init__(scope, construct_id, **kwargs)
        # The code that defines your stack goes here
        self.valheim_world = ValheimWorld(
            self,
            'ValheimWorld',
            cpu=2048,
            memory_limit_mib=4096,
            schedules=[ValheimWorldScalingSchedule(
                start=appScaling.CronOptions(hour='12', week_day='1-5'),
                stop=appScaling.CronOptions(hour='1', week_day='1-5'),
            )],
            environment={
                "SERVER_NAME": os.environ.get("SERVER_NAME", "CDK Valheim"),
                "WORLD_NAME": os.environ.get("WORLD_NAME", "Amazon"),
                "SERVER_PASS": os.environ.get("SERVER_PASS", "fargate"),
                "BACKUPS": 'false',
            })
We are almost ready to deploy a basic version of our Valheim server using the cdk-valheim construct. If we were to run the following command:
cdk deploy --app cdk/app.py --require-approval never
from the root of our project, it should work. This assumes that we have default credentials configured in ~/.aws/credentials and that we have also bootstrapped our AWS account with the resources it needs for CDK to work:
cdk bootstrap --app cdk/app.py aws://$AWS_ACCOUNT_ID/$AWS_DEFAULT_REGION
Setup GitLab CI job for automated deployments
Instead of deploying from the command line, it would be better to run the deployment from a CI/CD pipeline. Add a .gitlab-ci.yml file to the root of your project and populate it with the following YAML:
stages:
  - deploy

image: python:3.8

cdk_deploy:
  stage: deploy
  rules:
    - if: "$CI_COMMIT_TAG"
      when: always
  before_script:
    - apt-get -qq update && apt-get -y install nodejs npm
    - npm i -g aws-cdk
    - pip3 install -e cdk
  script:
    - cdk bootstrap --app cdk/app.py aws://$AWS_ACCOUNT_ID/$AWS_DEFAULT_REGION
    - cdk deploy --app cdk/app.py --require-approval never
Before we initialize a git repository in the root directory of our project, remove the .git repo that CDK created when we initialized the project with rf -rf cdk/.git. Now initialized a project in the root directory with git init.
Next, create a GitLab repository and add the remote to this project with:
git remote add origin git@gitlab.com:gitlab-username/project-name.git
In the GitLab project's Settings > CI/CD > Variables section, add the following environment variables as protected variables:
AWS_ACCESS_KEY_IDAWS_SECRET_ACCESS_KEYAWS_DEFAULT_REGIONAWS_ACCOUNT_IDAPPLICATION_PUBLIC_KEYSERVER_PASSSERVER_NAMEWORLD_NAME
Now under Settings > Repository > Protected Tags, add a wildcard (*) so that all tags are protected and only maintainers can push tags. This allows us to use the protected environment variables only when a trusted maintainer pushes a tag to the repository.
Edit the name of the stack and add region and account info
We are almost ready to create a tag and push to GitLab, but before we do that let's change the name of the CloudFormation stack that CDK will create in cdk/app.py:
#!/usr/bin/env python3

import os

from aws_cdk import core as cdk

# For consistency with TypeScript code, `cdk` is the preferred import name for
# the CDK's core module.  The following line also imports it as `core` for use
# with examples from the CDK Developer's Guide, which are in the process of
# being updated to use `cdk`.  You may delete this import if you don't need it.
from aws_cdk import core

from cdk.cdk_stack import CdkStack

aws_region = os.environ.get("AWS_DEFAULT_REGION", "us-east-1")
aws_account = os.environ.get("AWS_ACCOUNT_ID", "")


app = cdk.App()
CdkStack(
    app,
    "valheim-server-stack",
    env={"region": aws_region, "account": aws_account}
)

app.synth()
Now commit changes, create a tag and push it to GitLab:
git add .
git commit -m "initial commit"
git tag v0.0.1
git push origin v0.0.1
Check the logs of the GitLab CI pipeline that this creates in your GitLab project's CI/CD settings.
If everything runs successfully, you should be able to see your Valheim server listed in the list of community servers once it comes online, and you should be able to connect to it with the password you set in GitLab project variables.
Add the Lambda function handler code
We will have a simple Flask application respond the the Discord POST requests that send Interaction events. Let's add lambda-handler.py in lambda/functions/interactions/lambda-handler.py, and requirements.txt in lambda/functions/interactions/requirements.txt. Our project structure should look like this:
$ tree -L 4
.
├── cdk
│   ├── app.py
│   ├── cdk
│   │   ├── cdk_stack.py
│   │   └── __init__.py
│   ├── cdk.json
│   ├── README.md
│   ├── requirements.txt
│   ├── setup.py
│   └── source.bat
├── lambda
│   └── functions
│       └── interactions
│           ├── lambda-handler.py    <-- here
│           └── requirements.txt     <-- and here
├── README.md
└── register_bot.py
The requirements.txt defines the pip dependencies for our Lambda function. It should include the following:
aws-wsgi==0.2.7
discord-interactions==0.2.0
Flask==1.1.2
aws-wsgiwill transform API Gateway requests into WSGI application requests that Flask can handlediscord-interactionswill help us with some security-related requirementsFlaskwill be our web application framework
Here's the code for lambda-handler.py:
import os
import logging

import awsgi
import boto3
from discord_interactions import verify_key_decorator
from flask import (
    Flask,
    jsonify,
    request
)


client = boto3.client('ecs')

# Your public key can be found on your application in the Developer Portal
PUBLIC_KEY = os.environ.get('APPLICATION_PUBLIC_KEY')

logger = logging.getLogger()
logger.setLevel(logging.INFO)

app = Flask(__name__)


@app.route('/discord', methods=['POST'])
@verify_key_decorator(PUBLIC_KEY)
def index():
    if request.json["type"] == 1:
        return jsonify({"type": 1})
    else:
        logger.info(request.json)
        try:
            interaction_option = request.json["data"]["options"][0]["value"]
        except KeyError:
            logger.info("Could not parse the interaction option")
            interaction_option = "status"

        logger.info("Interaction:")
        logger.info(interaction_option)

        content = ""

        if interaction_option == "status":
            try:

                resp = client.describe_services(
                    cluster=os.environ.get("ECS_CLUSTER_ARN", ""),
                    services=[
                        os.environ.get("ECS_SERVICE_NAME", ""),
                    ]
                )
                desired_count = resp["services"][0]["desiredCount"]
                running_count = resp["services"][0]["runningCount"]
                pending_count = resp["services"][0]["pendingCount"]

                content = f"Desired: {desired_count} | Running: {running_count} | Pending: {pending_count}"

            except Error as e:
                content = "Could not get server status"
                logger.info("Could not get the server status")
                logger.info(e)

        elif interaction_option == "start":
            content = "Starting the server"

            resp = client.update_service(
                cluster=os.environ.get("ECS_CLUSTER_ARN", ""),
                service=os.environ.get("ECS_SERVICE_NAME", ""),
                desiredCount=1
            )

        elif interaction_option == "stop":
            content = "Stopping the server"

            resp = client.update_service(
                cluster=os.environ.get("ECS_CLUSTER_ARN", ""),
                service=os.environ.get("ECS_SERVICE_NAME", ""),
                desiredCount=0
            )

        else:
            content = "Unknown command"

        logger.info(resp)

        return jsonify({
            "type": 4,
            "data": {
                "tts": False,
                "content": content,
                "embeds": [],
                "allowed_mentions": { "parse": [] }
            }
        })

def handler(event, context):
    return awsgi.response(
        app,
        event,
        context,
        base64_content_types={"image/png"}
    )
Notice how we pass the Flask app to awsgi.response. aws-wsgi (or awsgi as it is imported) is the go-between for API Gateway and WSGI.
Add the CDK code for API Gateway and Lambda that will serve our Discord Interaction Endpoint URL
Now we can add the following code to cdk_stack.py to configure the API Gateway and Lambda function. Add the following to cdk_stack.py after our definition of self.valheim_world:
        self.env_vars = {
            "APPLICATION_PUBLIC_KEY": os.environ.get("APPLICATION_PUBLIC_KEY"),
            "ECS_SERVICE_NAME": self.valheim_world.service.service_name,
            "ECS_CLUSTER_ARN": self.valheim_world.service.cluster.cluster_arn
        }

        self.flask_lambda_layer = _lambda.LayerVersion(
            self,
            "FlaskAppLambdaLayer",
            code=_lambda.AssetCode("./layers/flask"),
            compatible_runtimes=[_lambda.Runtime.PYTHON_3_8,],
        )

        self.flask_app_lambda = _lambda.Function(
            self,
            "FlaskAppLambda",
            runtime=_lambda.Runtime.PYTHON_3_8,
            code=_lambda.AssetCode('./lambda/functions/interactions'),
            function_name="flask-app-handler",
            handler="lambda-handler.handler",
            layers=[self.flask_lambda_layer],
            timeout=core.Duration.seconds(60),
            environment={**self.env_vars},
        )

        self.flask_app_lambda.role.add_managed_policy(
            iam.ManagedPolicy.from_managed_policy_arn(
                self,
                'ECS_FullAccessPolicy',
                managed_policy_arn='arn:aws:iam::aws:policy/AmazonECS_FullAccess'
            )
        )

        # https://slmkitani.medium.com/passing-custom-headers-through-amazon-api-gateway-to-an-aws-lambda-function-f3a1cfdc0e29
        self.request_templates = {
            "application/json": '''{
                "method": "$context.httpMethod",
                "body" : $input.json("$"),
                "headers": {
                    #foreach($param in $input.params().header.keySet())
                    "$param": "$util.escapeJavaScript($input.params().header.get($param))"
                    #if($foreach.hasNext),#end
                    #end
                }
            }
            '''
        }

        self.apigateway = apigw.RestApi(
            self,
            'FlaskAppEndpoint',
        )

        self.apigateway.root.add_method("ANY")

        self.discord_interaction_webhook = self.apigateway.root.add_resource("discord")

        self.discord_interaction_webhook_integration = apigw.LambdaIntegration(
            self.flask_app_lambda,
            request_templates=self.request_templates
        )

        self.discord_interaction_webhook.add_method(
            'POST',
            self.discord_interaction_webhook_integration
        )
First we add some environment variables that will be made available to the Lambda function's execution environment. The ECS cluster and service name as well as our Discord application's PUBLIC_KEY are needed in the Lambda function for everything to work.
We have to give the lambda function permissions to make changes to ECS since it will be interacting with ECS via boto3.
self.request_templates is needed in order to pass the special security headers from the Discord POST request that are needed for security. I couldn't find a lot of resources on how to make this work, but I learned that this uses Apache Velocity Template Language.
Add a GitLab CI job for installing dependencies into Lambda Layer
There's one more step before we can push our code. We need to add another GitLab CI job that will install the Lambda dependencies so that they can be sent to the Lambda layer that we defined in our Lambda function. A Lambda Layer is where you install dependencies for this type of Lambda setup. Let's add the following stage:
stages:
  - build
  - deploy

image: python:3.8

pip_install:
  stage: build
  rules:
    - if: "$CI_COMMIT_TAG"
      when: always
  artifacts:
    paths:
      - layers/flask/python
  script:
    - pip install -r lambda/functions/interactions/requirements.txt -t layers/flask/python
Now we are installing dependencies into a target location (with the -t flag) that our Lambda Layer will be able to use in the cdk_deploy GitLab CI job. This is because we have indicated the path to layers/flask/python in the paths array of artifacts in the pip_install job. There are other ways to add the pip dependencies to the Lambda Layers. We don't absolutely need this to be done in a separate CI job.
Now tag and push the code to GitLab and check to see that the pipeline runs successfully.
Add the API Gateway URL to Discord Application settings
If everything runs smoothly, we should see a URL in the very last lines of the pipeline. This is the URL for our API Gateway endpoint:
https://abc123xyz.execute-api.us-east-1.amazonaws.com/prod/
We need to add discord to the end of this URL and then add that to our the Interactions Endpoint URL in the General Information section of our Discord application's admin page:
https://abc123xyz.execute-api.us-east-1.amazonaws.com/prod/discord
When we add this URL in the application settings, Discord will make sure that our endpoint is properly verifying the request based on its headers. Check out this function to see how it works:
def verify_key_decorator(client_public_key):
    from flask import request, jsonify

    # https://stackoverflow.com/questions/51691730/flask-middleware-for-specific-route
    def _decorator(f):
        @wraps(f)
        def __decorator(*args, **kwargs):
            # Verify request
            signature = request.headers.get('X-Signature-Ed25519')
            timestamp = request.headers.get('X-Signature-Timestamp')
            if signature is None or timestamp is None or not verify_key(request.data, signature, timestamp, client_public_key):
                return 'Bad request signature', 401

            # Automatically respond to pings
            if request.json and request.json.get('type') == InteractionType.PING:
                return jsonify({
                    'type': InteractionResponseType.PONG
                })

            # Pass through
            return f(*args, **kwargs)
        return __decorator
    return _decorator
If it fails verification, we will not be able to add the URL and it will not work. You might want to add some additional logging to the Lambda function if you are not able to add the URL successfully.
This is all covered in the documentation for Discord Interactions.
Now you should be able to run the Discord slash commands. You can get the status of your ECS cluster and scale it to either 1 or 0 for ON and OFF.
Overview
Here's an overview of what we covered:
- This is my computer. For development of this project (and most other projects) I used Windows with WSL2.
- GitLab CI - This is used to run our automated pipelines whenever we push a tag.
- The CDK CLI is used to create, update and delete the infrastructure in our AWS account.
- Valheim - The client for the game server that we set up
- The public IP address of the ECS Task that can be used to connect to our server on port 2456.
- The ECS Cluster that runs the actual docker container for the Valheim server. By default, the image used is lloesche/valheim-server.
- EFS - This is the file system that is mounted onto the container of the ECS task where our game's world data is stored.
- AWS Backup (Optional) - This is an optional feature of the
cdk-valheimconstruct that can make regular backups of our EFS file system. - Events (Optional) - AWS Events can be used to scale the number of ECS tasks between 0 and 1.
- This is the
cdk-valheimconstruct that I use in this project. - S3 bucket for syncing data to and from EFS with DataSync (WIP)
- DataSync for moving game data between EFS and S3.
- The Slash Commands that we set up
- Discord
- Discord Interactions sends and a
POSTrequest - The API Gateway endpoint that we configured to handle Discord Interaction
POSTrequests. - The Lambda function running a simple Flask app that responds to the Interaction
POSTrequest. - boto3 - This is the AWS SDK Python library included in the Python execution environment that allows us to interact with the resources in our AWS account. In particular, the interactions we use from boto3 are the
update_serviceanddescribe_servicsmethods from the ECS module. This allows us to turn our server on and off and also get the status. - This represents the
valheim-server-stackwe defined in our CDK application.
TODO
There are still some things that I'm working on finalizing.
- DataSync for easily moving data between S3 and EFS
- Report billing data with an additional slash command sub-command
- Add tagging to the resources in our stack to make the billing command easier to implement.
- Get feedback from the Discord, CDK and Valheim communities about what I can improve here
- Contribute to
gotodeploy/cdk-valheim
Thanks for reading!