
Mediation Simulator: My submission for the NVIDIA Agent Intelligence Toolkit Hackathon
Last updated May 27, 2025
Building Mediation Simulator for the NVIDIA Agent Intelligence Toolkit Hackathon!
Version Note: This article was published in May 2025. As of March 2026, Qwen3.5 is available (the article references Qwen3-8b). The NVIDIA Agent Intelligence Toolkit and associated NIMs may have updated versions since publication. Check official documentation for the latest releases.
I'm excited to share a project I've been building for the NVIDIA Agent Intelligence Toolkit Hackathon: Mediation Simulator! The NVIDIA Agent Intelligence Toolkit (or AgentIQ Toolkit, as it's often called) is a powerful open-source library designed for connecting, evaluating, and accelerating teams of AI agents. My goal? To see if I could leverage this toolkit to build AI agent teams capable of simulating the entire, complex process of a law school mediation competition.
Check out my 𝕏 Post that introduces the project:
📑🤝🤖⚖️
— Brian Caffey (@briancaffey) May 23, 2025
Mediation Simulator is my submission for the NVIDIA Agent Intelligence Toolkit Hackathon!
This application simulates law school mediation competitions using agentic workflows with LLMs, orchestrated by the NVIDIA Agent Intelligence Toolkit #NVIDIAHackathon @NVIDIAAIDev… pic.twitter.com/sXDVyMkmkw
What is Mediation Simulator? And Why Mediation?
At its core, Mediation Simulator is my attempt to model the nuanced, semi-structured, three-way conversations that happen in mediation. Law school mediation tournaments are events where students practice negotiation and dispute resolution skills. This seemed like a really interesting challenge! How do you get language models to effectively navigate such a dynamic environment?
Mediation competitions also present some unique data challenges that are perfect for AI:
- Layered Information: There are "common facts" known to everyone, and "confidential facts" privy only to one party (and sometimes shared strategically with the mediator or the other side).
- Dynamic Conversations: The main discussion involves all three parties (mediator and two disputants), but it also features "caucuses"—private, two-way conversations between the mediator and one party.
- Creative Scenarios: The cases are entirely fictional, often involving made-up companies, fictional countries, and even fictional currencies! This is a deliberate choice to help students avoid real-world biases. And guess what? AI is really good at generating fake data!
What I built
Mediation Simulator consists of three main components:
- Case Generation Workflow: A CLI tool that uses LLMs to generate realistic mediation case scenarios, complete with common facts, confidential information for each party, and supporting documents. This workflow creates the foundation for all mediation simulations. The data for the case scenarios is saved in both YAML files and in my Redis database. I'll talk about why I did chose to store data in local files and on Redis later in this article.
- Automated Mediation Workflow: Another CLI tool that orchestrates a full mediation session between three AI agents (mediator, requesting party, and responding party). This workflow simulates the entire mediation process, from opening statements through negotiation to conclusion, with the AI agents engaging in realistic dialogue based on their roles and the case information. A clerk agent helps to guide the conversation, controlling who the next speaker should be based on a summary of what has already been said by different parties.
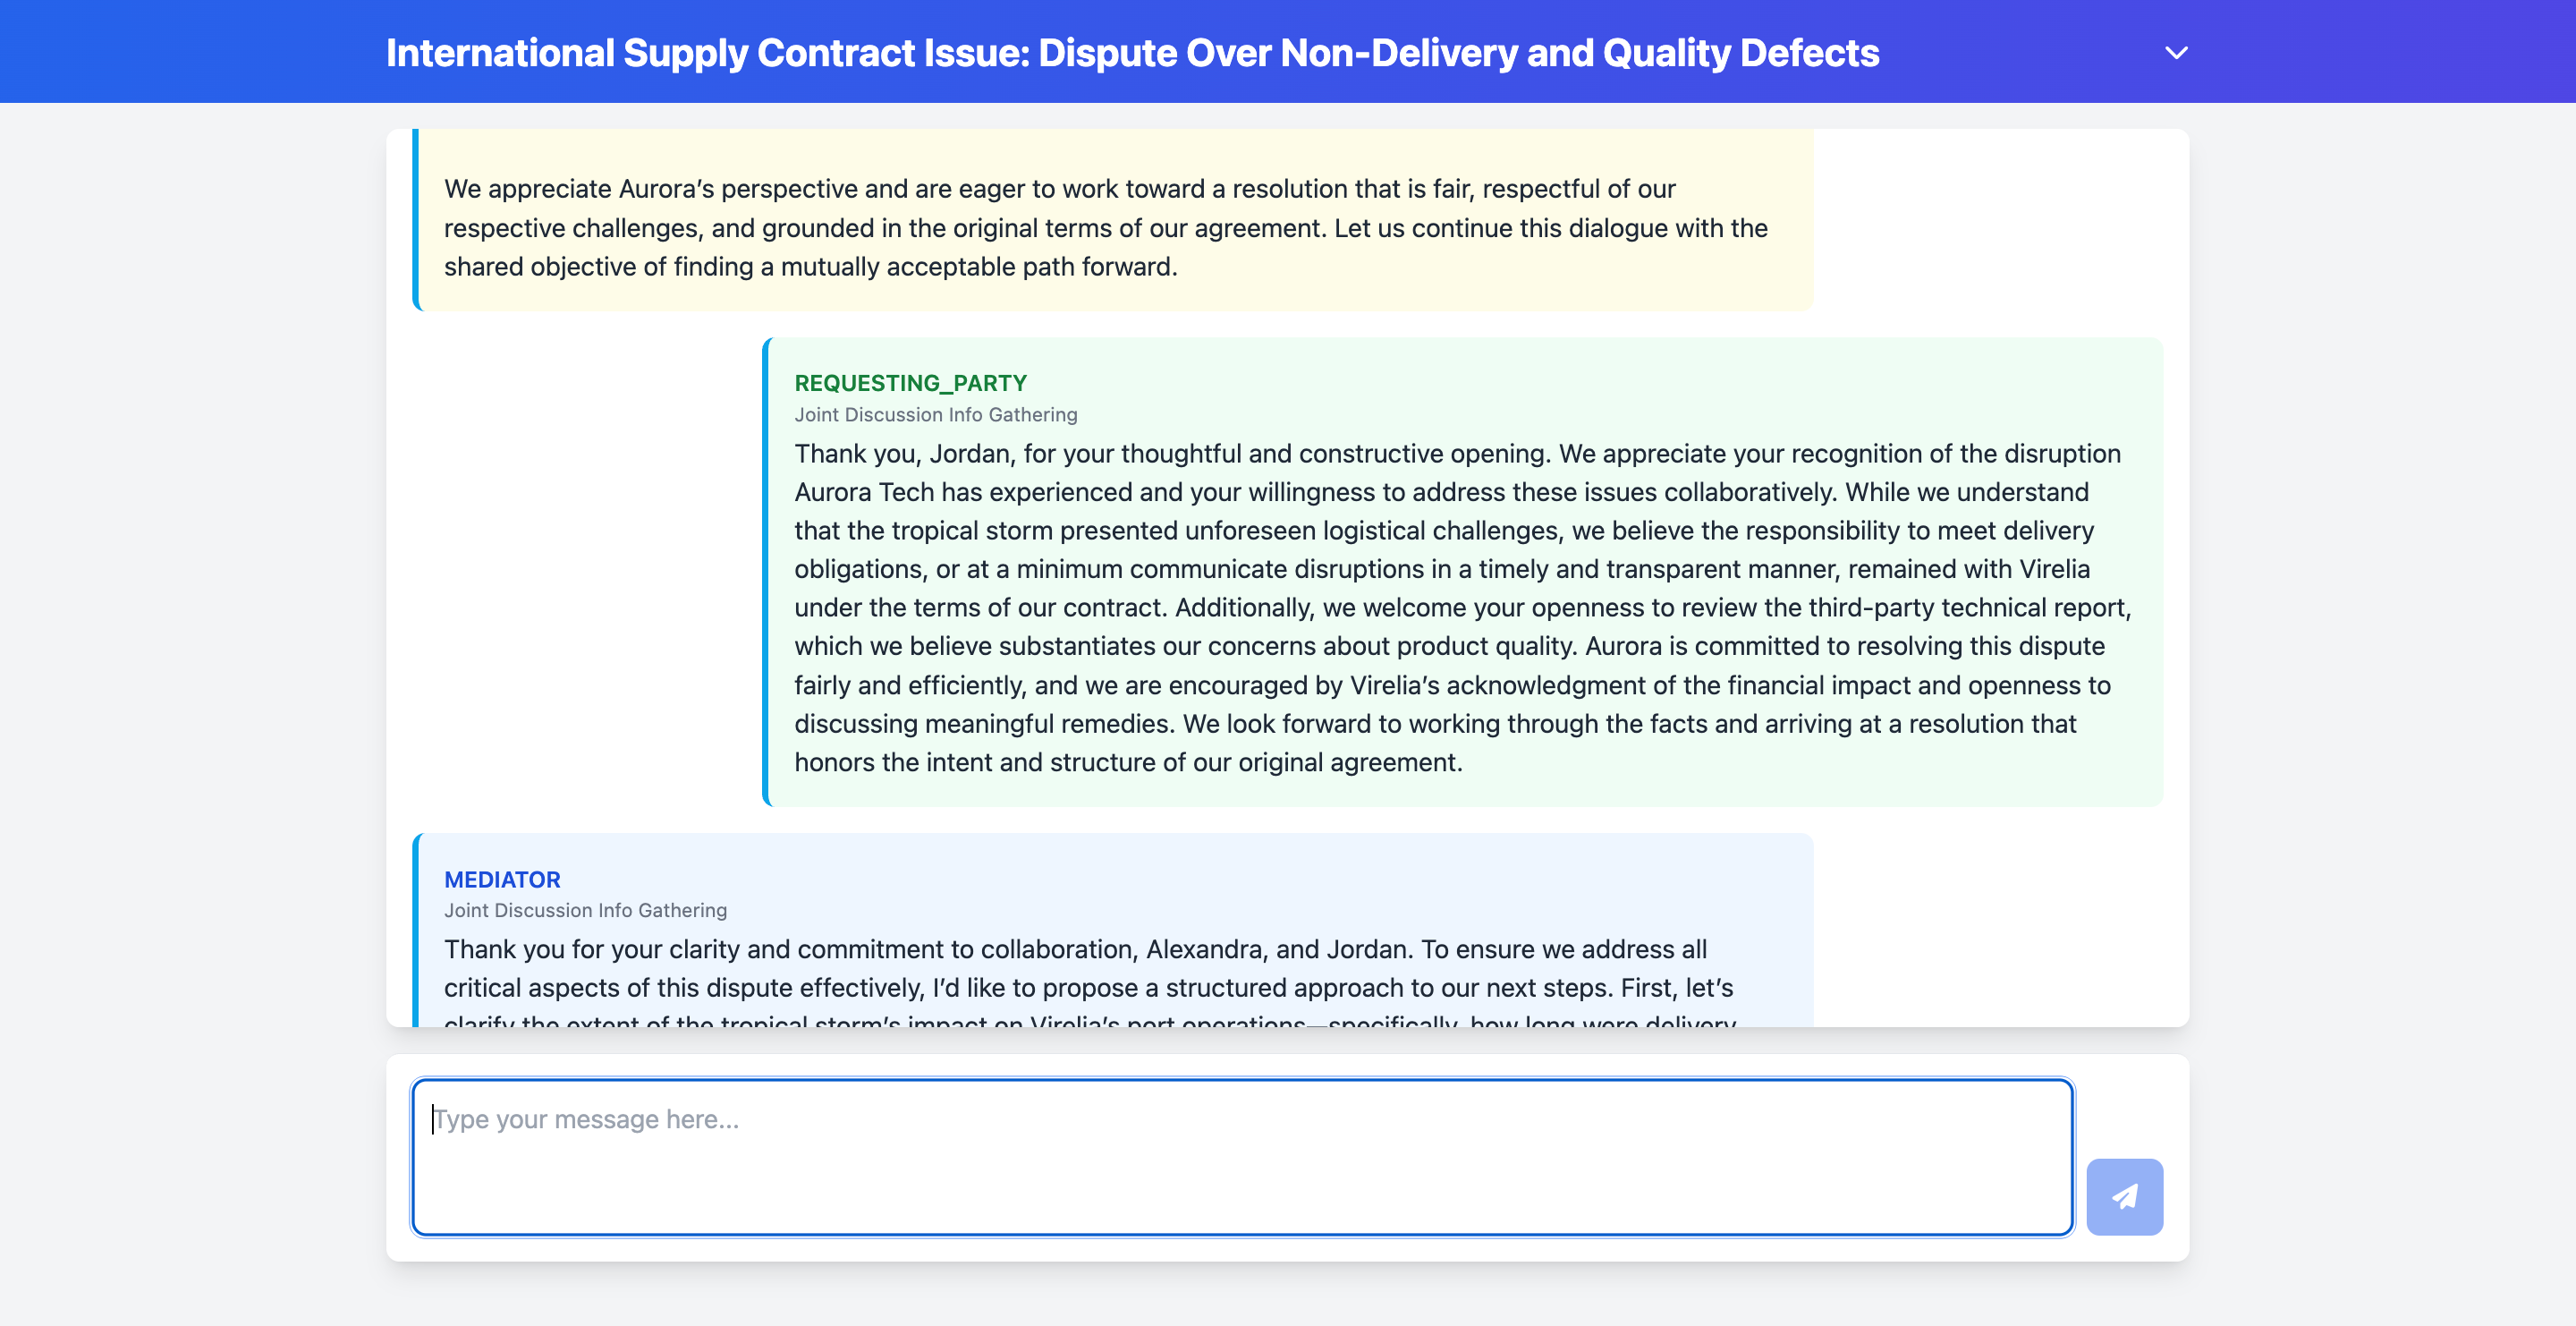
- Interactive Mediation API: A REST API that allows a human user to participate in a mediation session by taking on the role of either the requesting or responding party. The API manages the session state and coordinates the interaction between the human participant and the AI mediator and opposing party. The conversation history for the mediation session is stored in Redis using a memory backend that I implemented with NVIDIA Agent Intelligence Toolkit.
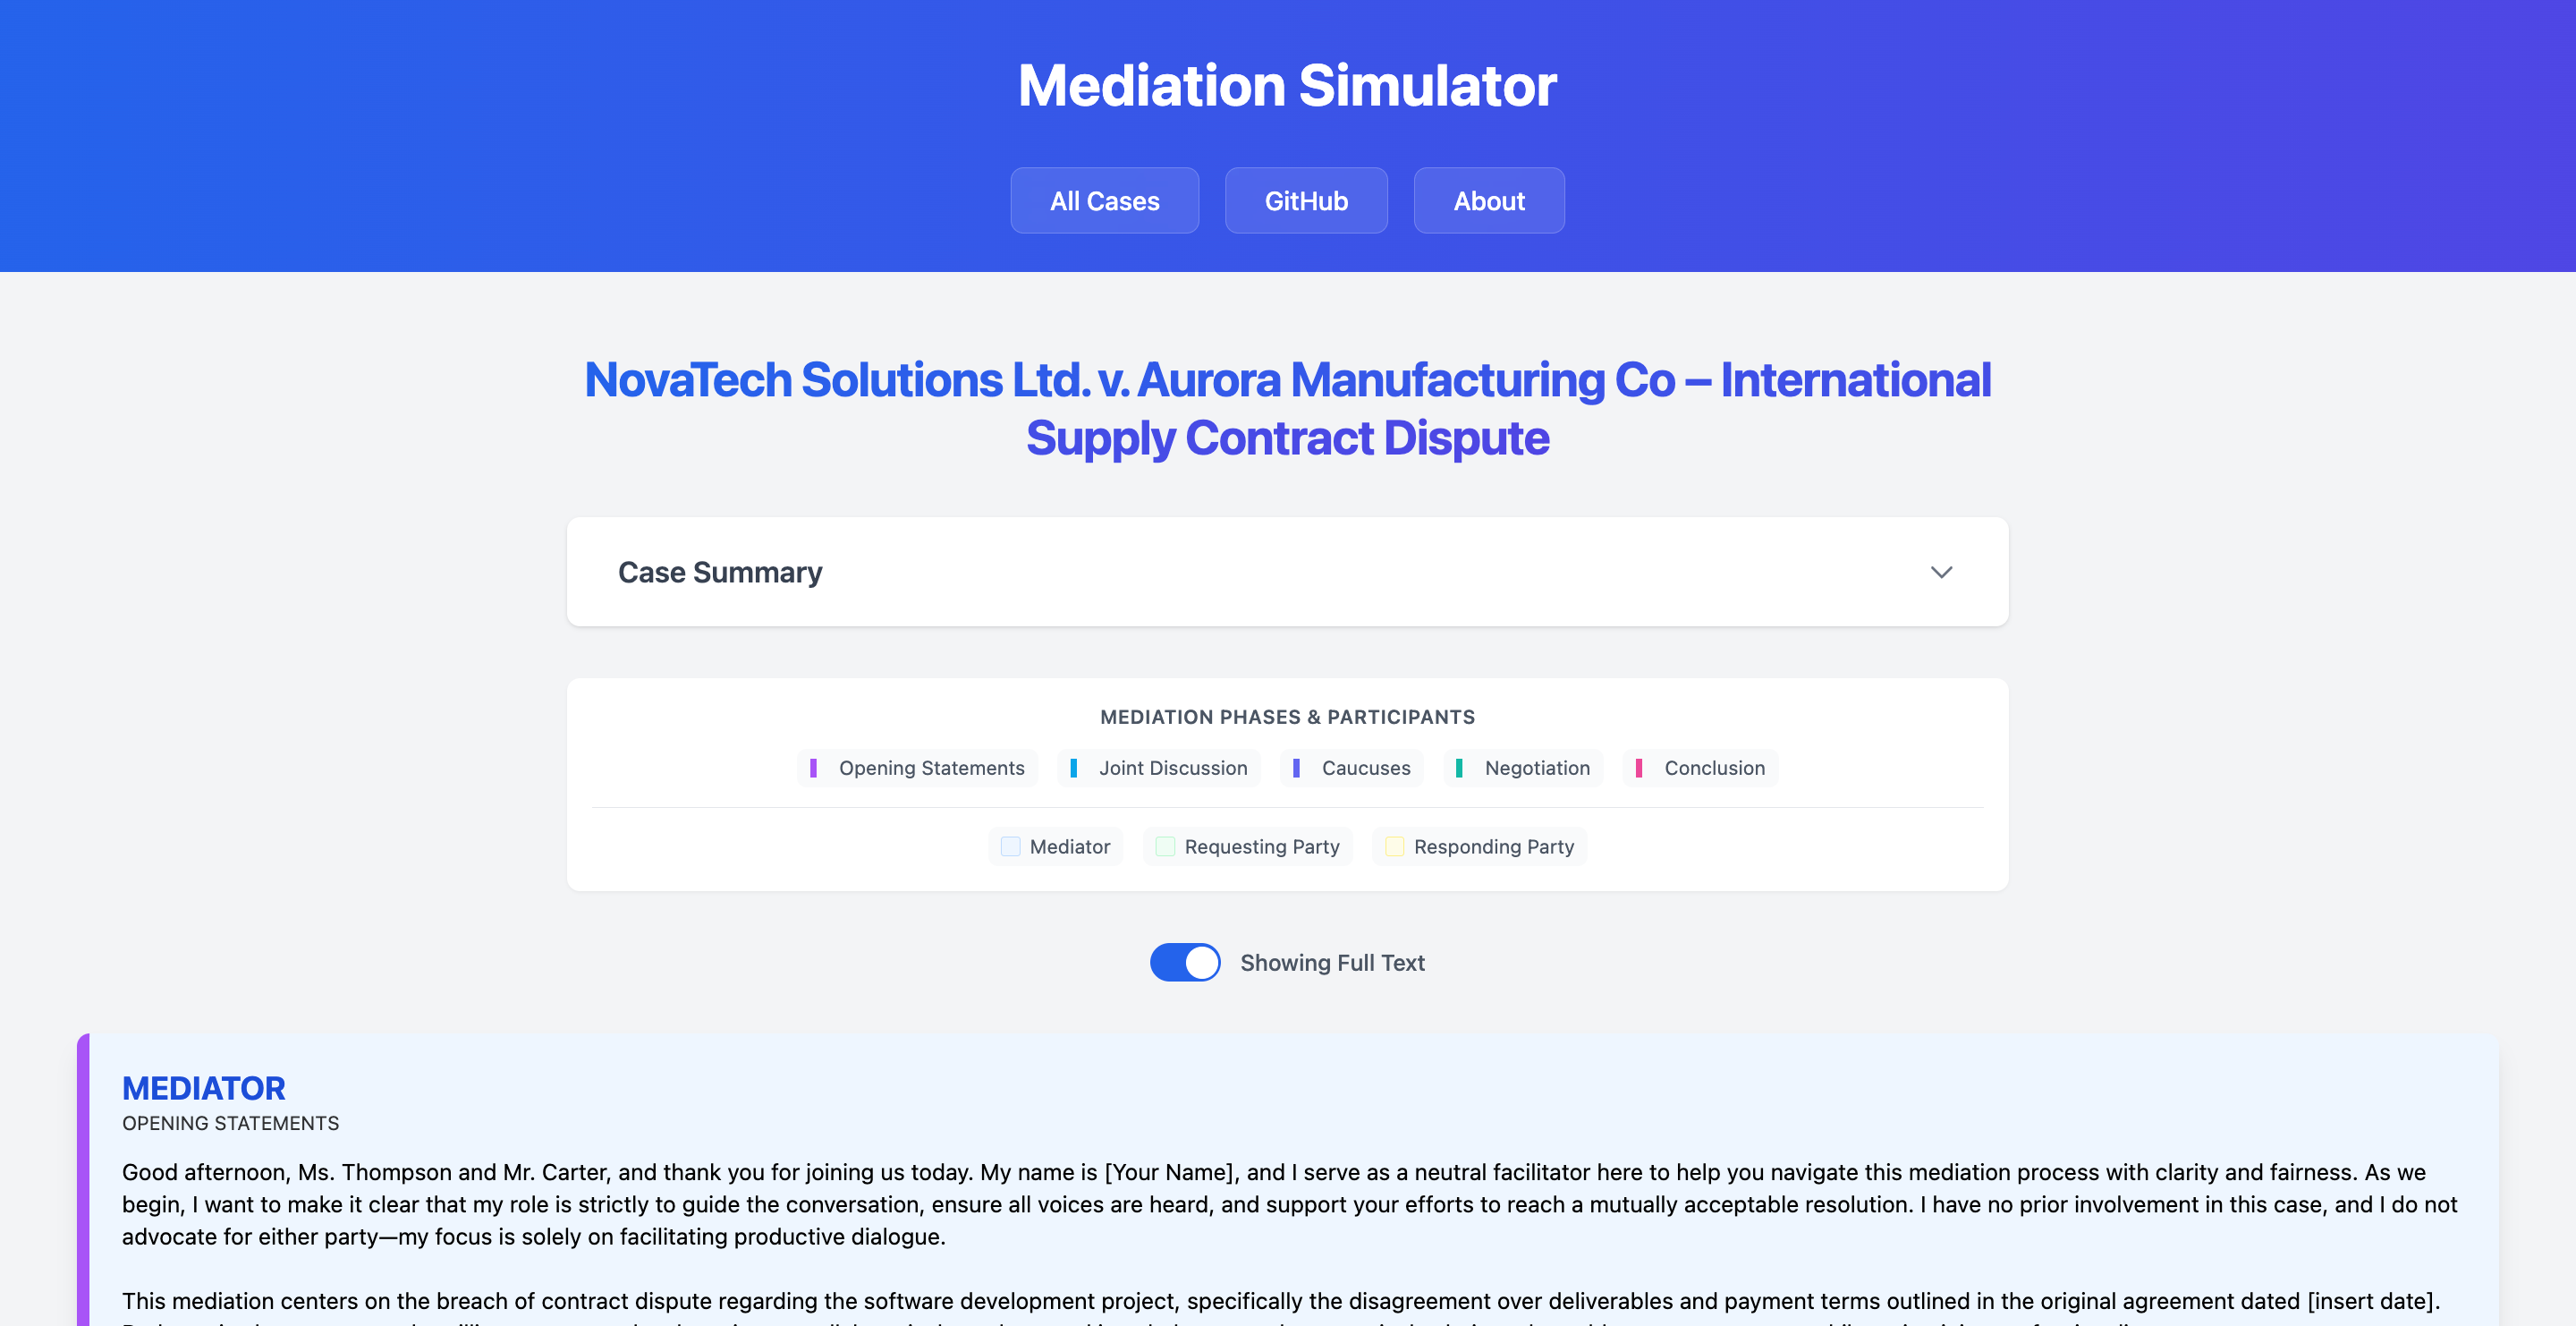
To make the results of these workflows easily viewable, I also built two web interfaces:
- A Viewer Interface that displays the full three-party dialogue from automated mediation sessions, making it easy to review and analyze the AI agents' interactions.
- An Interactive Interface that provides a chat-like experience for human participants in the interactive mediation mode, with real-time updates and a clean, intuitive design.
The Genesis: From Idea to Data
The first major hurdle was generating the foundational case data. Here's how that unfolded:
- Deep Dive Research: I started by brainstorming with an LLM (OpenAI's o3, in this case) to get a comprehensive understanding of law school mediation competitions. I wanted to know everything: the rules, structure, participants, judging criteria and different types of cases.
- Prompt Engineering for Cases: With that knowledge, I tasked another LLM (GPT-4o) with generating prompts to be used for creating diverse and realistic (albeit fictional) mediation case scenarios.
- Case Generation: Using these prompts, I generated sets of distinct cases facts and related documents.
- Structuring with LangGraph: To manage the data for each case, I used LangGraph. I designed a state object to encapsulate all crucial elements:
- Common facts.
- Confidential facts for both the requesting and responding parties.
- Related Documents! This was my own little twist. I wanted to test RAG (Retrieval Augmented Generation) integration within the agentic workflow. Could parties use tools to search for information in these documents to bolster their arguments during mediation? Ultimately I couldn't really get this to work. I'll share more on why later in this article.
- Data Persistence: With the data structured, I saved it in accessible formats: the LangGraph state was serialized to YAML, and the case details (like facts and documents) were stored in Markdown files. I also stored same LangGraph state to Redis using a simple JSON string.
Orchestrating the Simulation
With the case data ready, the next step was to build out the mediation simulation itself:
- Defining the Flow: I broke down the mediation process into its typical phases:
- Opening Statements
- Information Gathering
- Caucuses (for each party)
- Negotiation
- Conclusion
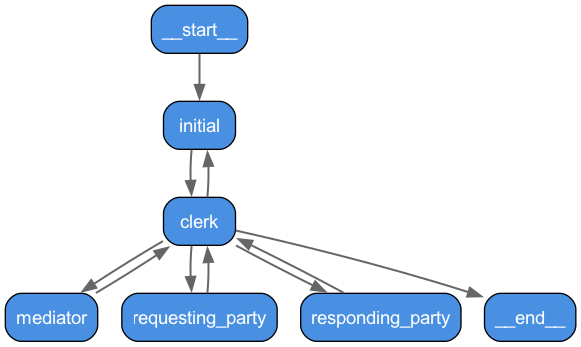
- Assembling the Agent Team: I set up a LangGraph graph consisting of:
- A Mediator agent
- Two Party agents (Requesting and Responding parties)
- A Clerk agent, whose job is to help manage the conversation flow and transition the simulation between the different phases.
- Dynamic Prompting: The prompts for the mediator and the parties (both when initiating a statement and when responding) change significantly based on the current phase of the mediation. Critically, these prompts also dynamically include a summary log of what has already been said, providing context.
- Message Logging: Each time a party speaks, I store the message using my Redis backend and also store additional metadata in the
additional_kwargssection of each message, such as the speaker, the current phase of mediation and a summary of the message (the summary is generated by another LLM call that just summarizes the response.)
Getting to a functional mediation workflow was crucial! It allowed me to see the actual dialogue unfold and immediately highlighted areas for improvement. For instance, I realized that prompts needed to guide parties to ask one clear question at a time, directed at a specific participant, rather than posing multiple questions to several people at once. This really helps keep the simulated conversation straightforward and more realistic. I also had to instruct the LLM to use the names of the different parties, and I had to provide the names of the parties to the prompt. Without this instruction the LLM would give responses like this: "Hello Requesting Party Name, thank you for sharing your opinion."
Here's a look at the main workflow generated from the LangGraph code:
Bringing it to Life: The "Vibe Coding" Web Viewer!
Reading through raw Markdown files or terminal output to follow a complex, multi-turn mediation isn't ideal. I needed a better way to visualize the results! And this is where a bit of "vibe coding" came in incredibly handy.
I prompted an LLM to generate a single HTML page using Vue.js and Tailwind CSS. My requirements were simple: list all generated mediation cases, and when a case is selected, display the full dialogue. The amazing part? I never actually looked at the generated code in detail! I was able to make incremental improvements by simply describing changes or new features I wanted, and the LLM iterated until it was almost exactly what I envisioned. This was super easy and fast! I also made a page that lists all of the different mediation sessions with cover images that I generated with the NVIDIA Flux.1 Dev NIM:
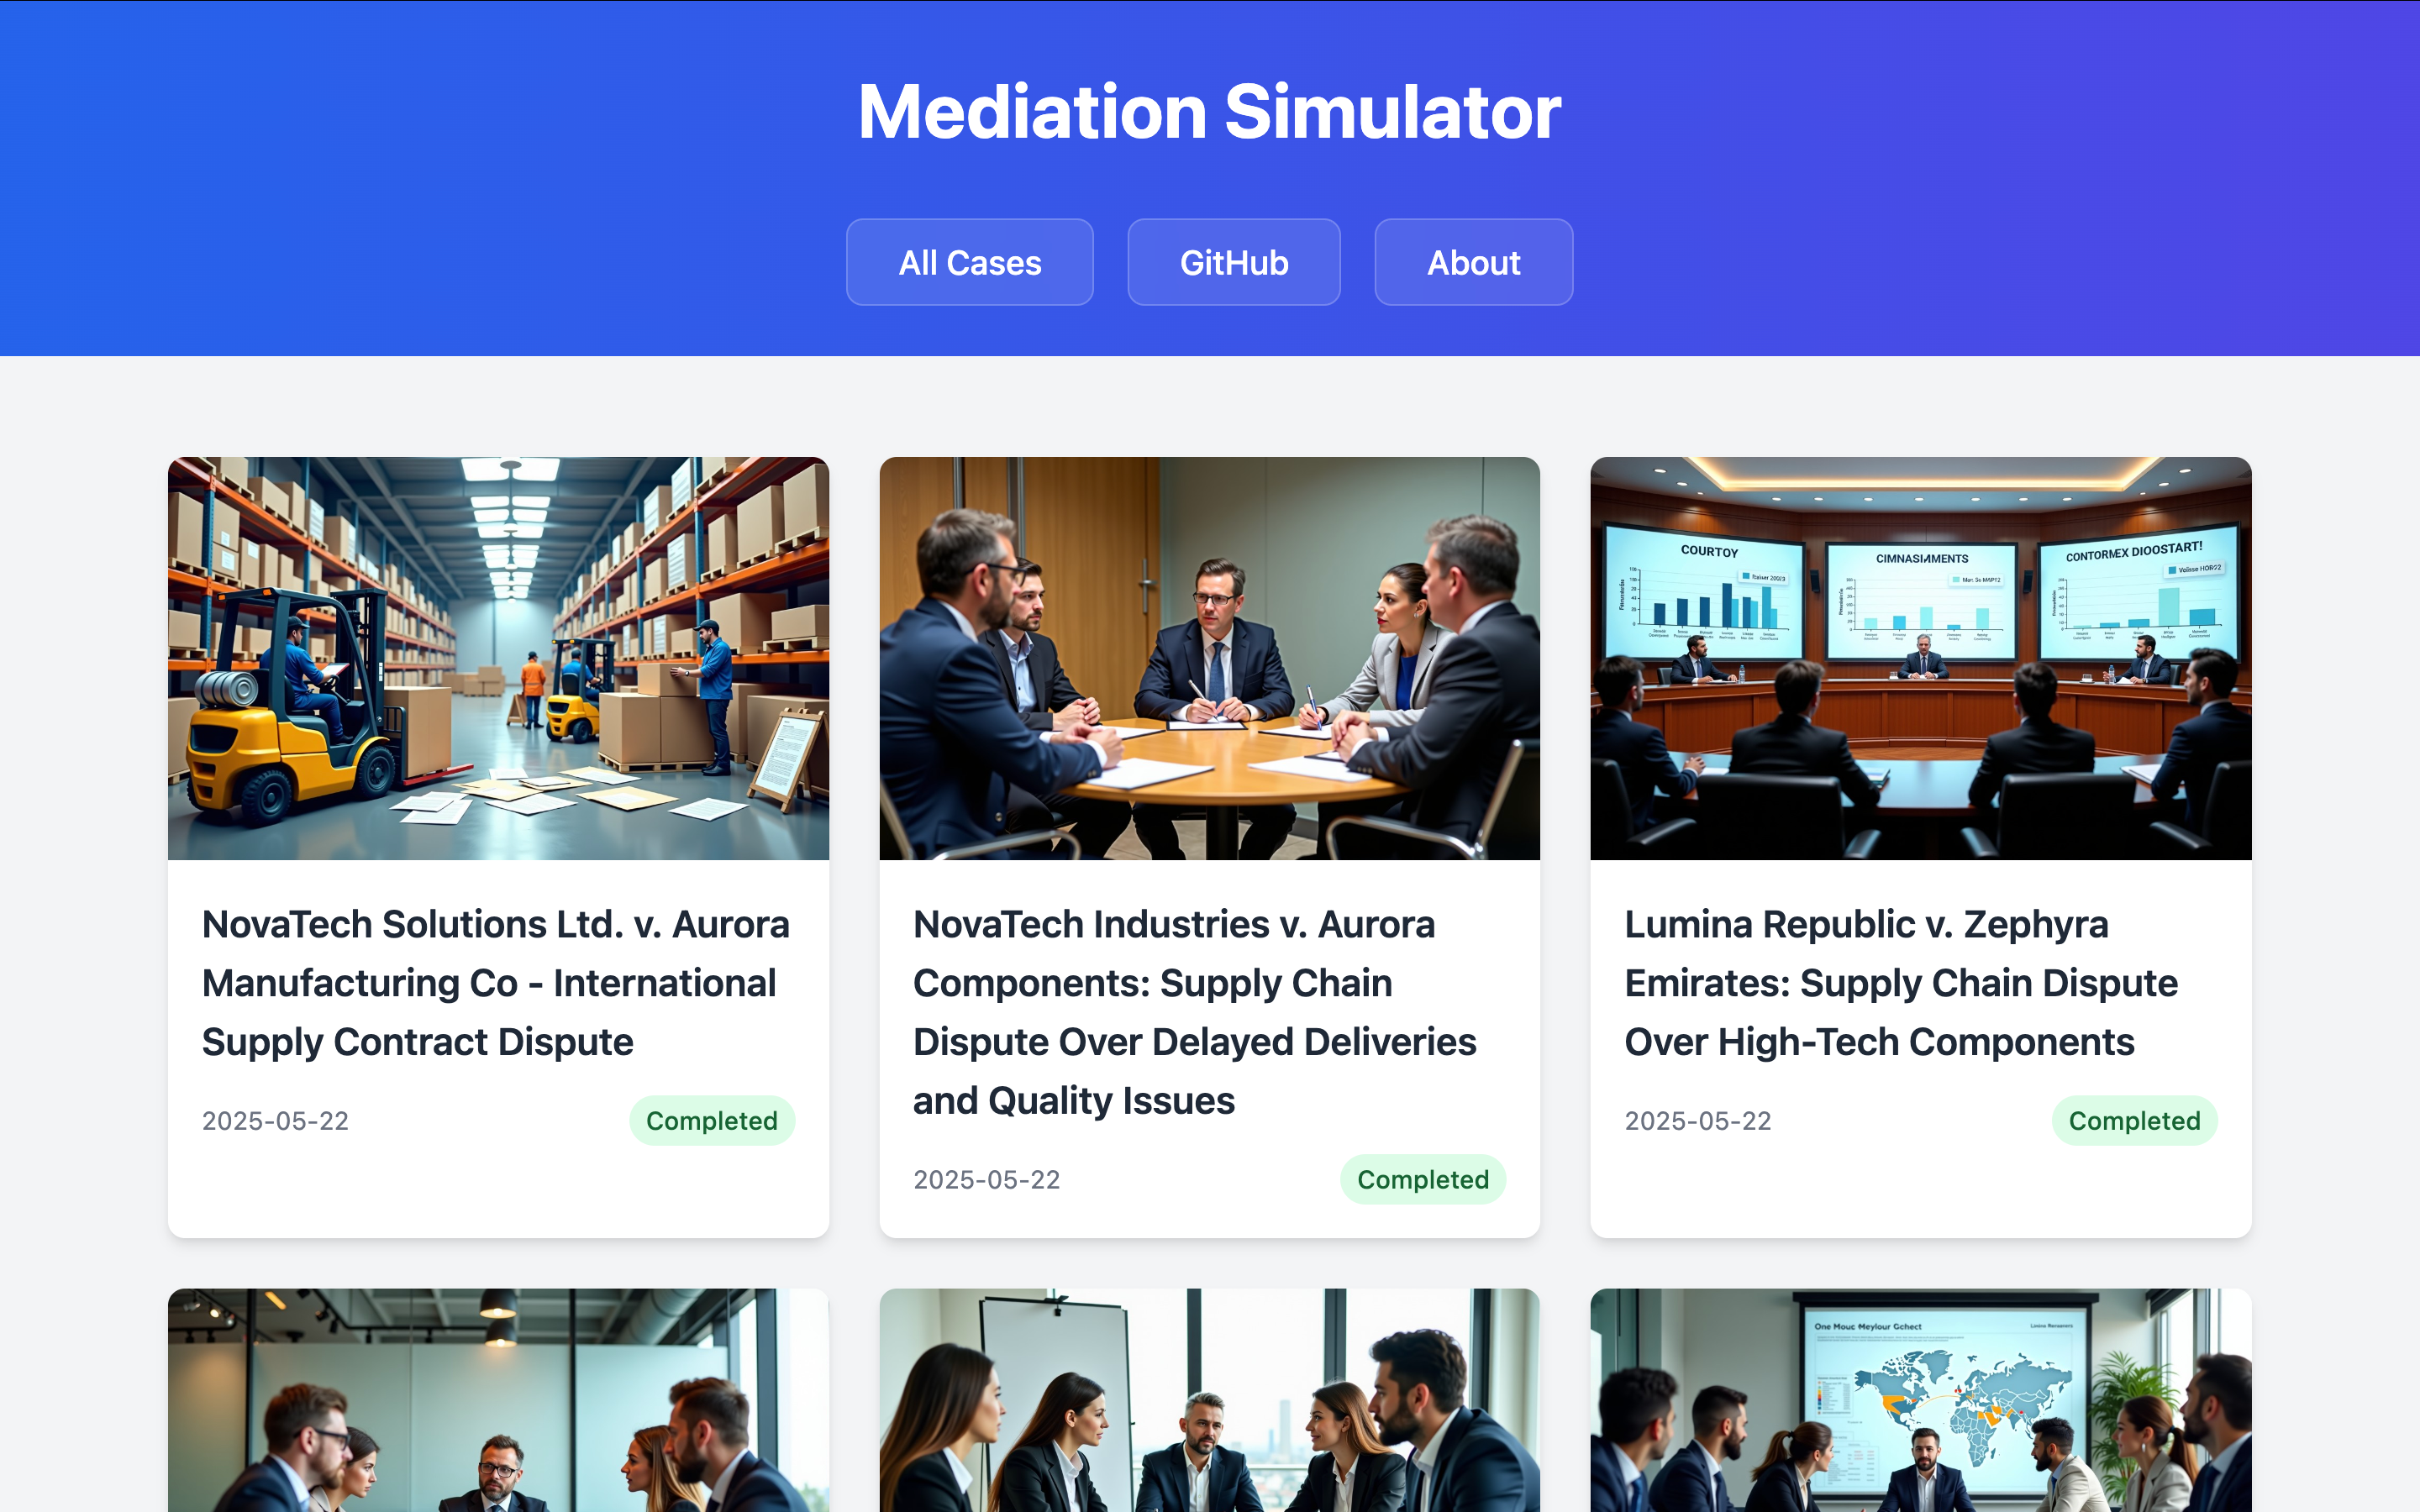
Having this simple web interface has been a game-changer for reviewing simulations. Plus, keeping it in my project repository means I can easily host it on GitHub Pages at briancaffey.github.io/mediation-simulator to share the results of my project. It's just so much better than staring at text files, and took just a few minutes to put together.
A deeper look into the NVIDIA Agent Intelligence Toolkit
Now, I know what some developers think about LLM frameworks like LangChain/LangGraph, LlamaIndex, and CrewAI—there's often a bit of "framework fatigue." But hear me out! The NVIDIA Agent Intelligence Toolkit brings all of these Frameworks together in a manageable way and it makes it really easy to not only write an agentic program, but it also makes it really easy to read other programs written with the framework.
The key to understanding the AIQ Toolkit is the config files. These are YAML files that neatly list out all of the dependencies of your agentic application. Let's take a look at the config file I made for mediation simulator. It's a long file, so I'll share it and then break down the important sections:
general:
use_uvloop: true
front_end:
_type: fastapi
cors:
allow_origins: ['*']
allow_methods:
- GET
- POST
- OPTIONS
endpoints:
- path: /case/{case_id}
method: GET
description: Gets the mediation case for the given case ID.
function_name: get_mediation_case
- path: /case/{case_id}/session/{session_id}
method: GET
description: Gets the mediation session data for the given case ID and session ID.
function_name: get_mediation_session
- path: /case/{case_id}/session/{session_id}/send
method: POST
description: Sends a message to the mediation session for the given case ID and session ID.
function_name: send_message_to_mediation_session
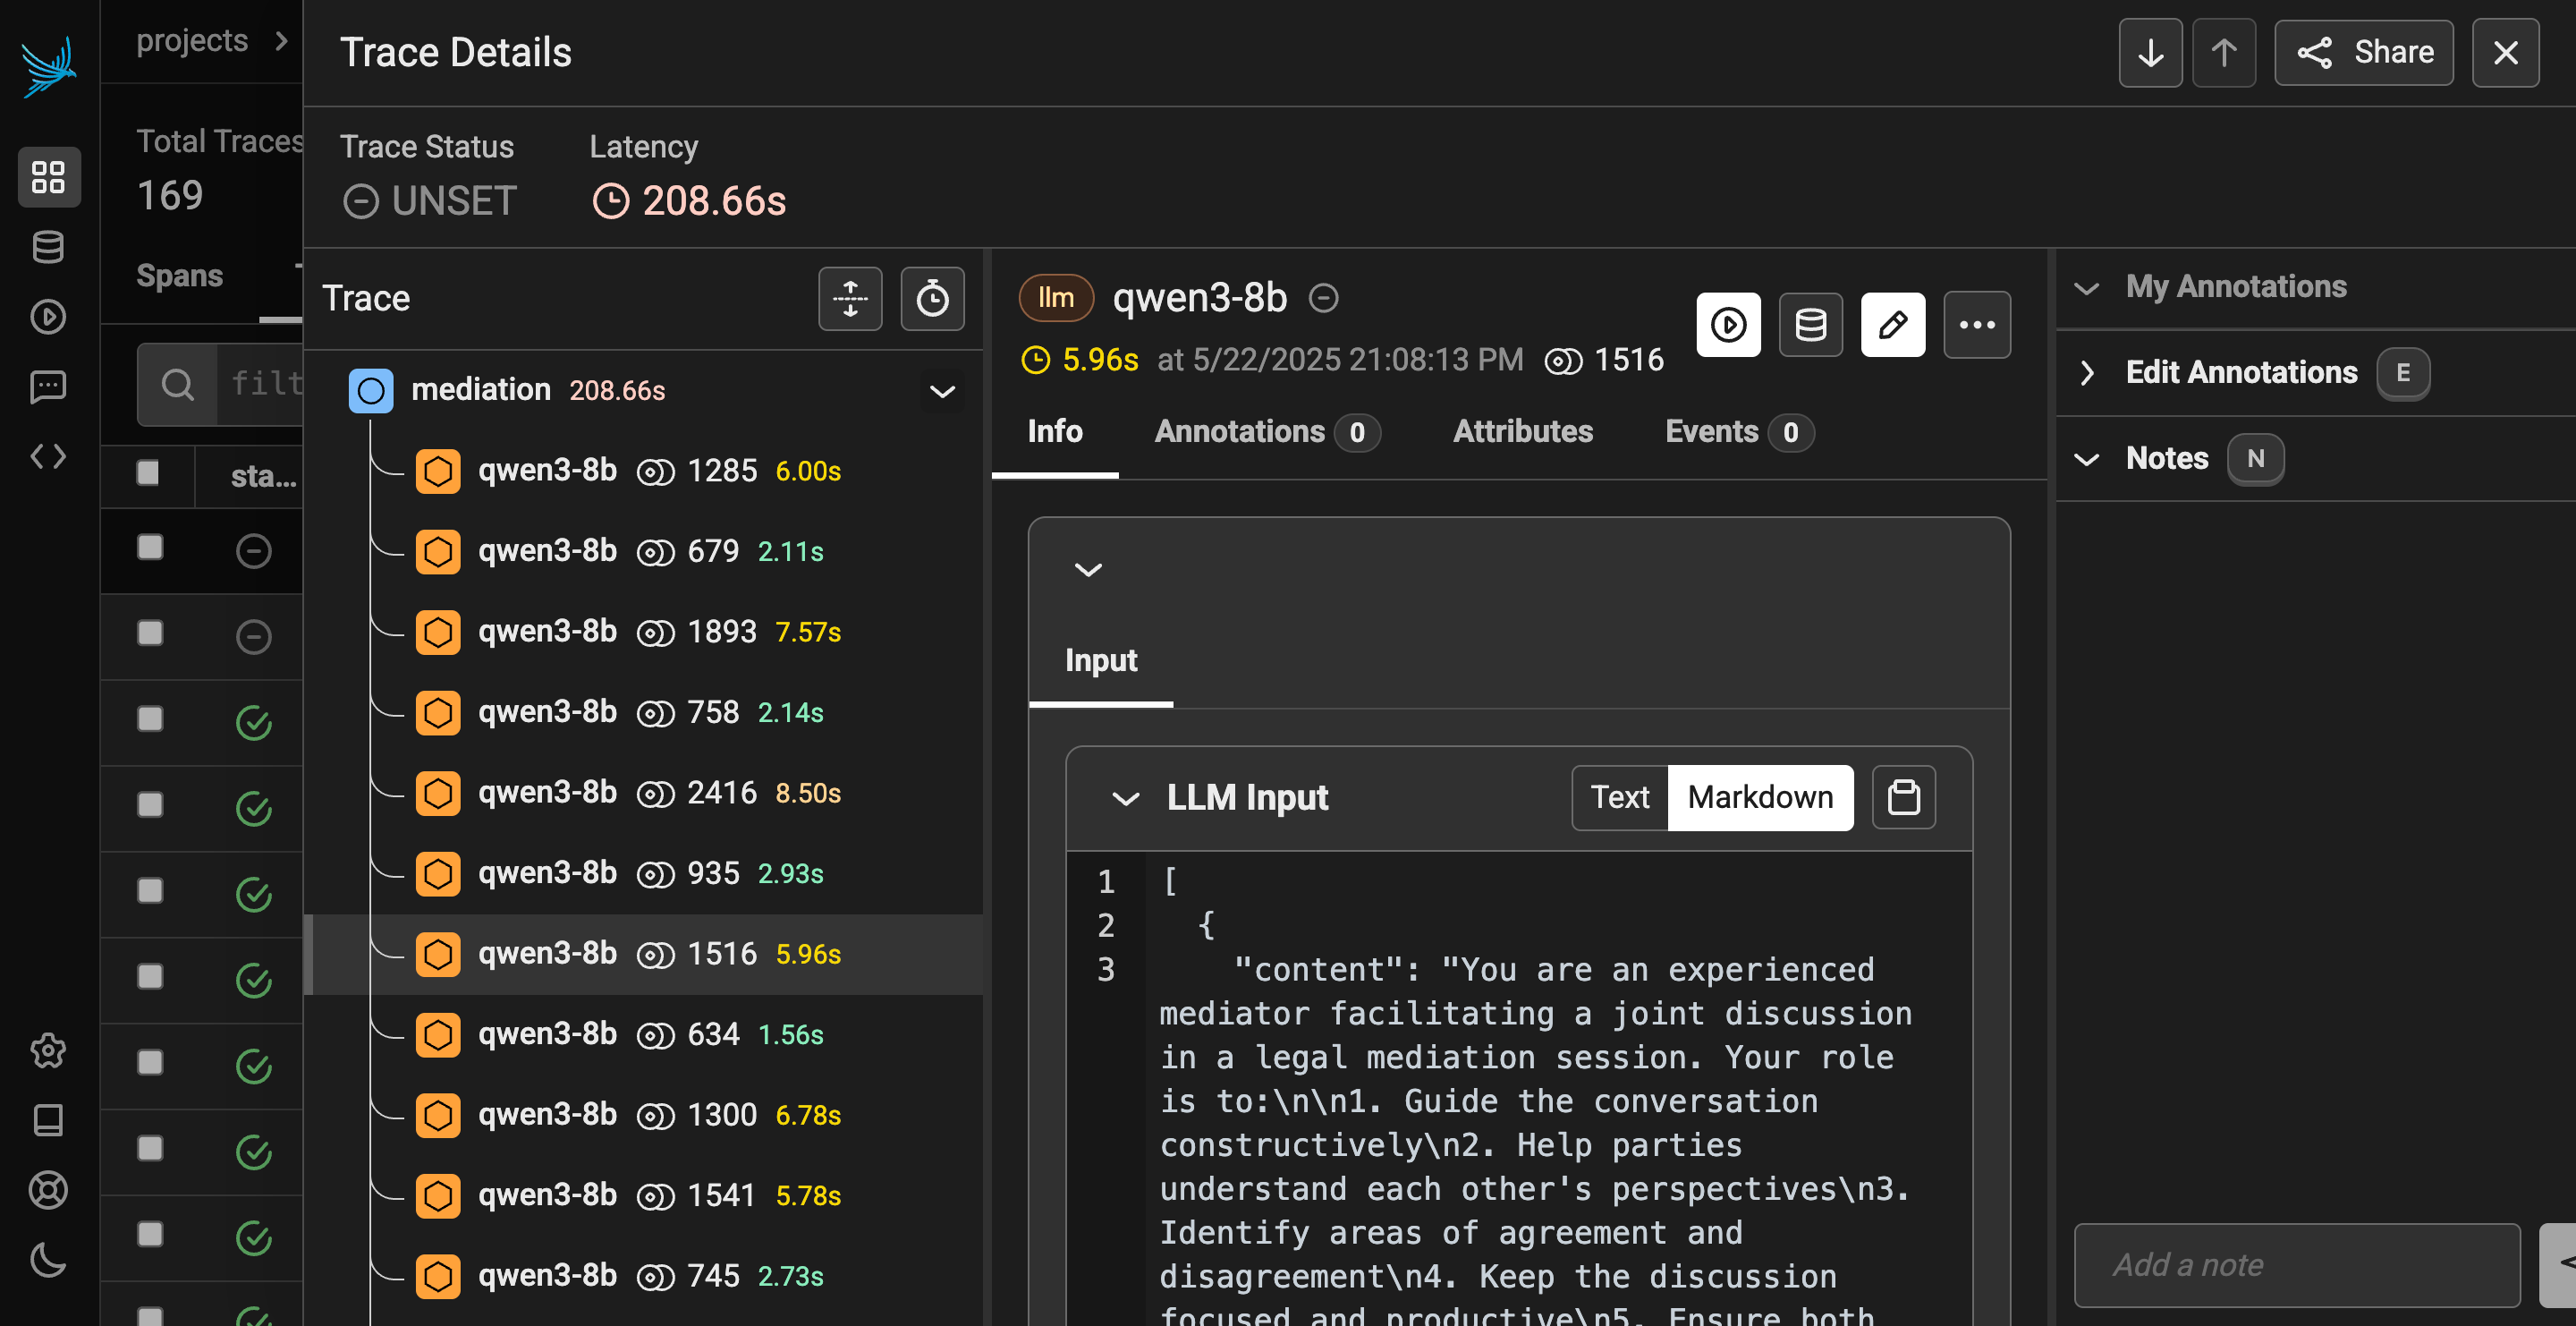
telemetry:
enabled: false
tracing:
phoenix:
_type: phoenix
endpoint: http://localhost:6006/v1/traces
project: default
retrievers:
milvus_retriever:
_type: milvus_retriever
uri: "http://localhost:19530"
embedding_model: "nv-embedqa-e5-v5"
collection_name: "aiq_case_documents"
vector_field: "embedding"
search_params:
metric_type: "IP" # works best with nv-embedqa-e5-v5
llms:
nim_llm:
_type: nim
base_url: http://192.168.5.96:1234/v1
model_name: qwen3-8b
max_tokens: 10000
temperature: 0.7
mediation_llm:
_type: nim
base_url: http://192.168.5.96:1234/v1
model_name: qwen3-8b
max_tokens: 10000
temperature: 0.7
memory:
redis_memory:
_type: redis_memory
connection_url: redis://localhost:6379/0
functions:
case_document_rag:
_type: case_document_rag
retriever: milvus_retriever
llm_name: nim_llm
collection_name: "mediation_simulator_case_documents"
top_k: 5
case_query_agent:
_type: case_query_agent
llm_name: nim_llm
tool_names:
- case_document_rag
verbose: true
max_iterations: 5
# server route functions
get_mediation_case:
_type: server/get_mediation_case
get_mediation_session:
_type: server/get_mediation_session
send_message_to_mediation_session:
_type: mediation
embedders:
nv-embedqa-e5-v5:
_type: nim
base_url: http://192.168.5.96:8000/v1
model_name: nvidia/nv-embedqa-e5-v5
workflow:
_type: mediation
llm: mediation_llm
data_dir: ./data
Let's start at the top with general key
general
This section mainly defines the API routes for the FastAPI integration and the telemetry options I set up to view all of my programs traces. When building applications with LLMs, instrumenting for observability is key! Agent Intelligence Toolkit makes it really easy to hook up not just one observability tool, but really any number of observability tools! It all works through asynchronous calls, so it doesn't slow down the application.
Defining the API routes was pretty straightforward. You define an AIQ Toolkit function that handles the route's behavior. These routes are also automatically added to the API's documentation page using OpenAPI/Swagger:

retrievers
This section allows you to define different vector storage databases that your application uses. I used Milvus to store embeddings of case documents. Ultimately I wasn't able to incorporate these embeddings into my application.
llms
The LLMs section allows you to plug in to any LLM. I used a combination of LM Studio and NVIDIA NIMs to test my application. You can pretty much use any LLM that provides an OpenAI API interface. Local models have come a long way! New models like Qwen3 and Llama 3.1 have massive context windows (130k tokens!) which is a total game changer. These models are also getting a lot smarter. I was really impressed with how well these models followed my prompts. Using local models is nice because you will not be rate limited. I processed about 2 million prompt tokens and generated about 1.5 million completion tokens during the development of Mediation Simulator. As amazing as these new frontier models are now, I'm still bullish on the capabilities of (small) large language models that can run on consumer hardware like NVIDIA RTX GPUs.
memory
Figure out how memory works in the AIQ toolkit was a big "ah-ha!" moment for me. It allows for persisting chat messages between generations, and also storing arbitrary data that you can use in your workflows. I decided to use Redis (Redis Stack) to build a memory backend. Here's a quick look at what that code looks like:
@register_memory(config_type=RedisMemoryConfig)
async def redis_memory(config: RedisMemoryConfig, builder: Builder):

    class RedisMemoryEditor(MemoryEditor):
        def __init__(self, config: RedisMemoryConfig):
            self._conn_url = config.connection_url
            self.redis = Redis.from_url(self._conn_url)

        async def get_client(self, session_id: str) -> RedisChatMessageHistory:
            conn = RedisChatMessageHistory(
                session_id=session_id, redis_url=self._conn_url
            )
            return conn

        # mediation session state management
        async def add_messages(
            self, items: Sequence[BaseMessage], session_id: str
        ) -> None:
            client = await self.get_client(session_id)
            await client.aadd_messages(items)

        async def get_messages(self, session_id: str) -> Sequence[BaseMessage]:
            client = await self.get_client(session_id)
            messages = await client.aget_messages()
            return messages

        # case generation state management
        async def save_case_description(
            self, case_description: str, case_id: str
        ) -> None:
            """
            sets the case description using the <case_id>_case_description as the redis key
            """
            self.redis.set(f"{case_id}_case_description", case_description)

        ...
I found that LangChain has a RedisChatMessageHistory class that made putting this backend together almost trivial. Redis Stack also ships with a web viewer which really came in handy for debugging my memory backend:
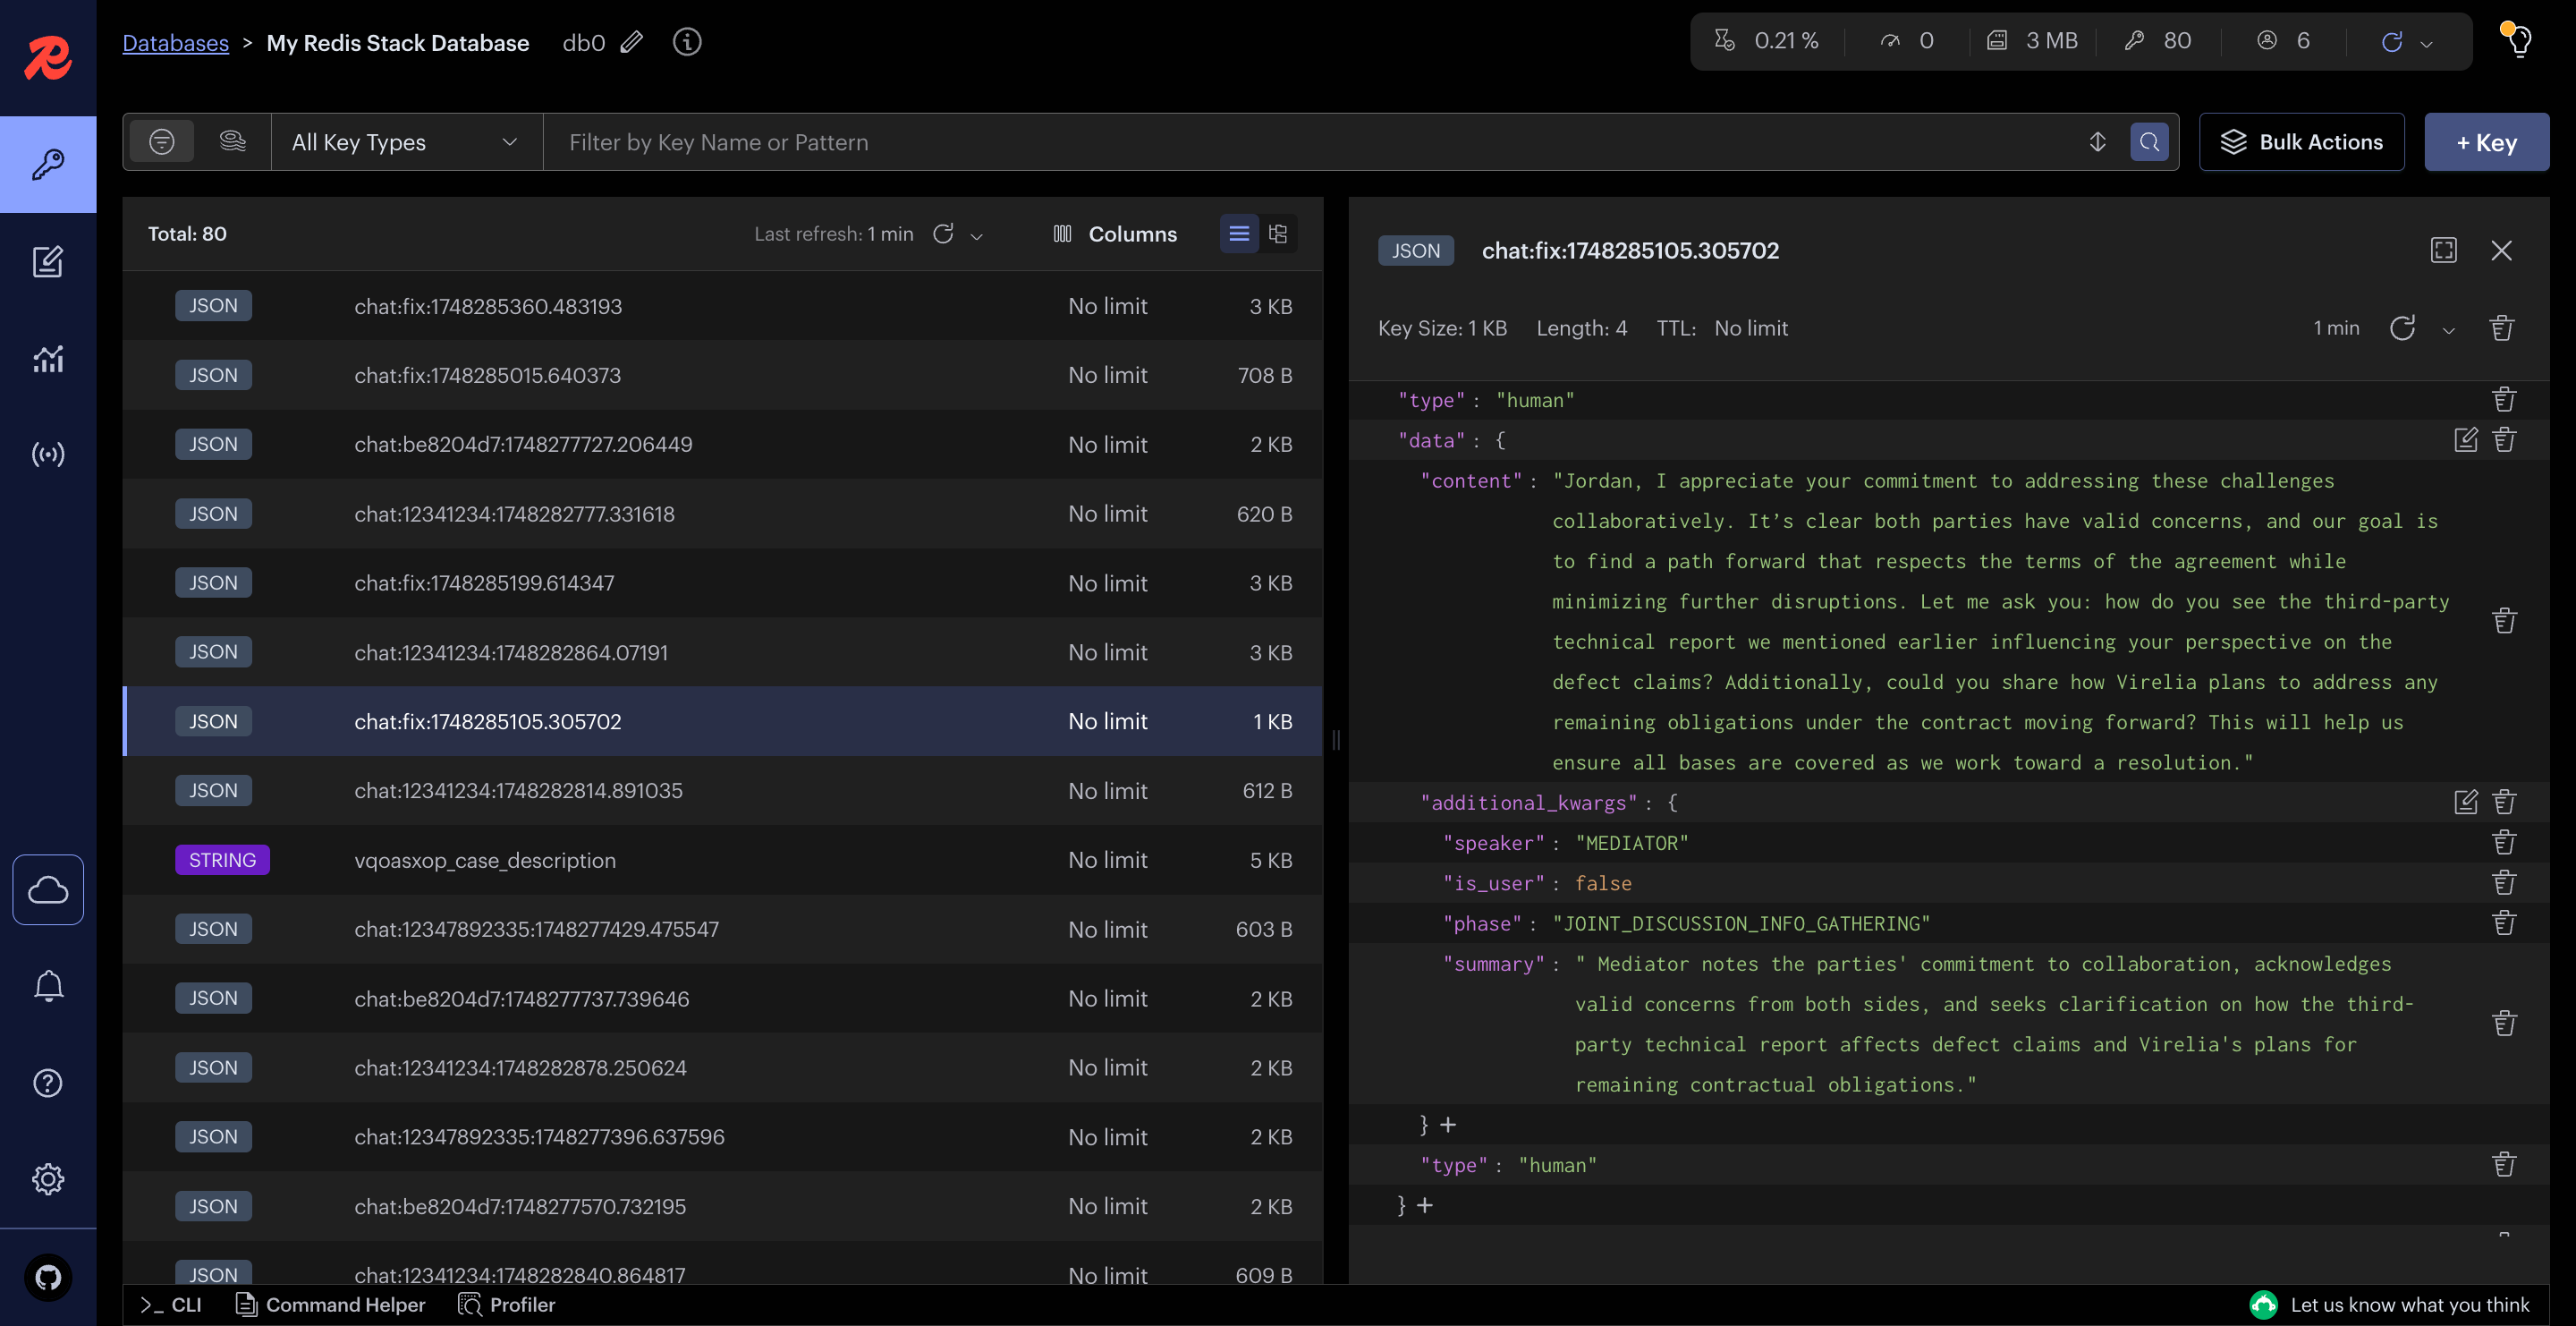
For storing other types of data, I was able to implement my own methods and store things like case data or other metadata for a mediation simulator session for things like current_speaker, number of session, current session, etc. I love Redis! The setup is also really easy, I just added a docker compose file:
services:
  redis:
    image: redis/redis-stack:latest
    volumes:
      - redis-data:/data
    container_name: redis
    ports:
      - 6379:6379
      - 8001:8001  # RedisInsight port

volumes:
  redis-data:
functions
Functions are the building blocks of the AIQ Toolkit. You need to register the functions in your config file, then you can use them for different things, like the function that handles an API route, or the function that handles an agentic workflow. I defined some functions for RAG to allow my agents to look up case data, but I wasn't able to fully implement this in my main mediation simulator workflow. But the setup was easy!
embedders
Embedders is a section that allows you to define embedding models that you would use together with RAG (for converting text to a vector embedding). Since I needed to make a lot of embeddings for all of the documents I generated for case facts, I used a locally hosted NVIDIA NIM:
embedders:
  nv-embedqa-e5-v5:
    _type: nim
    base_url: http://192.168.5.96:8000/v1
    model_name: nvidia/nv-embedqa-e5-v5
I would have run into rate limits if I was using the hosted version, so being able to run this locally was important for my use case.
workflow
The workflow is the main "application" part of the config file. It is the entrypoint for your application. In my case, the workflow invokes a LangGraph that does my simulation. First it loads data from my memory backend and when I'm using the interactive mode it gathers information from the request like path parameters so it knows what data fetch from memory (like the case id and session id).
My mediation workflow code is a little bit messy. I tried to keep all of my prompting logic in separate files for simplicity. The trickiest part for me was serializing data between different formats: langgraph state, YAML files and Redis memory. I'm happy to have something now that is functional, but there are a lot of improvements and further refactoring that would make the code easier to read and maintain.
That wraps up the tour of my main config file for mediation simulator! I also had another smaller config file for case generation. Here's a quick look at that:
general:
  use_uvloop: true
  telemetry:
    enabled: false
    tracing:
      phoenix:
        _type: phoenix
        endpoint: http://localhost:6006/v1/traces
        project: mediation-simulator

llms:
  nim_llm:
    _type: nim
    base_url: http://192.168.5.96:1234/v1
    model_name: qwen3-8b
    max_tokens: 10000
    temperature: 0.7
  # nim_llm:
  #   _type: nim
  #   model_name: meta/llama-3.1-70b-instruct
  #   max_tokens: 10000
  #   temperature: 0.7

memory:
  redis_memory:
    _type: redis_memory
    connection_url: redis://localhost:6379/0

workflow:
  _type: case_generation
  llm_name: nim_llm
  data_dir: ./data
I added a lot of logging to my workflow in order to keep an eye on how the workflows progressed. Here's a sample of the logs from the CLI invocation of the mediation simulator program:
12:08:48 mediation.register INFO ⚖️ [MEDIATOR]: Mediator node called
12:08:56 mediation.register INFO 👤 [CLERK] Starting clerk node - Phase: JOINT_DISCUSSION_INFO_GATHERING, Turn: 3
12:08:56 mediation.register INFO 🤔 [CLERK] Using LLM to decide next speaker
12:09:12 mediation.register INFO 🎯 [CLERK] LLM selected next speaker: RESPONDING_PARTY
12:09:12 mediation.register INFO 📊 [CLERK] Updated counters - Turn: 4, Phase turns: 4
12:09:12 mediation.register INFO 🌚 Responding party node called
12:09:20 mediation.register INFO 👤 [CLERK] Starting clerk node - Phase: JOINT_DISCUSSION_INFO_GATHERING, Turn: 4
12:09:20 mediation.register INFO 🤔 [CLERK] Using LLM to decide next speaker
12:09:23 mediation.register INFO 🎯 [CLERK] LLM selected next speaker: REQUESTING_PARTY
12:09:23 mediation.register INFO 📊 [CLERK] Updated counters - Turn: 5, Phase turns: 5
12:09:23 mediation.register INFO 🌝 Requesting party node called
12:09:31 mediation.register INFO 👤 [CLERK] Starting clerk node - Phase: JOINT_DISCUSSION_INFO_GATHERING, Turn: 5
12:09:31 mediation.register INFO ⏰ [CLERK] Max turns (5) reached for current phase
12:09:31 mediation.register INFO 🔄 [CLERK] Transitioning from joint discussion to negotiation
12:09:31 mediation.register INFO 👨⚖️ [CLERK] Mediator will start the new phase
12:09:31 mediation.register INFO ⚖️ [MEDIATOR]: Mediator node called
12:09:40 mediation.register INFO 👤 [CLERK] Starting clerk node - Phase: NEGOTIATION_BARGAINING, Turn: 5
12:09:40 mediation.register INFO 🤔 [CLERK] Using LLM to decide next speaker
12:09:48 mediation.register INFO 🎯 [CLERK] LLM selected next speaker: REQUESTING_PARTY
12:09:48 mediation.register INFO 📊 [CLERK] Updated counters - Turn: 6, Phase turns: 1
12:09:48 mediation.register INFO 🌝 Requesting party node called
12:09:56 mediation.register INFO 👤 [CLERK] Starting clerk node - Phase: NEGOTIATION_BARGAINING, Turn: 6
12:09:56 mediation.register INFO 🤔 [CLERK] Using LLM to decide next speaker
12:09:58 mediation.register INFO 🎯 [CLERK] LLM selected next speaker: RESPONDING_PARTY
12:09:58 mediation.register INFO 📊 [CLERK] Updated counters - Turn: 7, Phase turns: 2
Config files can be as simple or as complex as they need to be depending on your workflow.
The AgentIQ Toolkit is doing something really valuable by bringing patterns and components from these (and other) frameworks into a cohesive system. This allows for some truly interesting and powerful combinations. The examples provided are excellent and taught me a lot about new patterns for building agentic workflows. ReWOO agents, for instance, were a new concept for me, as was seeing how to effectively combine LangGraph with LlamaIndex.
What I particularly appreciated was:
- Standardized Patterns: AgentIQ promotes good practices for crucial aspects of AI development, like evaluations and telemetry/tracing.
- YAML Configuration: I really like using YAML for configuring development environments, similar to Docker Compose. It standardizes things and vastly improves readability. The way AgentIQ allows registering functions that can be included in workflows via YAML config files is a great example of this.
- A Learning Goldmine: Working through as many examples as possible was incredibly beneficial. Reading the code helped me grasp the patterns underpinning AgentIQ. You are pretty much guaranteed to learn something new!
I'm so glad I took the plunge and got my feet wet with the AgentIQ Toolkit. It's been a fantastic learning resource.
Mediation Competitions, But for LLMs?
One of the fun, forward-looking ideas this project sparks is the concept of "mediation competitions, but for LLMs." Imagine pitting different LLMs against each other, representing the requesting and responding parties, to see how they fare in these complex negotiation scenarios!
What's Next?
This hackathon project has been an incredible learning journey. Building Mediation Simulator has not only been a fun technical challenge but has also opened my eyes to the potential of AI agents in simulating complex human interactions. I'm excited to continue refining it and exploring more possibilities with the AgentIQ Toolkit!