Flux Plug-in for Project G-Assist
Last updated July 20, 2025
This article will discuss my submission for the Project G-Assist Hackathon: Flux Plug-in for Project G-Assist. This plugin allows RTX AI PC users to tap into their GPU's image generation capabilities through the Flux.1-dev NVIDIA NIM. G-Assist now generates images from your commands on demand!
Flux Plug-in for Project G-Assist
— Brian Caffey (@briancaffey) July 19, 2025
⚡️🎨🤖🖼️🖥️⚡️
Generate stunning images on your NVIDIA GeForce RTX AI PC with natural language using G-Assist#AIonRTXHackathon
🖼️ @bfl_ml flux.1-dev & flux-kontext
🎶 @SunoMusic “vibes” by @briancaffey
🗣️ @nari_labs dia (video narration)
my… pic.twitter.com/JyXwkz68Lj
The Flux Plugin for G-Assist is a plugin developed for NVIDIA’s Project G-Assist that brings real-time AI image generation directly to the desktop through natural language commands. It allows users to create high-quality images using the Flux family of models from Black Forest Labs, seamlessly integrated with the G-Assist interface. Users can simply type or speak prompts such as “a futuristic robot painter in a neon-lit workshop”, and the plugin handles the entire process—from submitting the prompt to generating and displaying the image—all without leaving the G-Assist chat window.
The plugin supports multiple deployment backends for inference, including Flux NIMs running locally via WSL, on the cloud via build.nvidia.com, or through InvokeAI using the Flux Kontext model for image-to-image and screenshot-based transformations. The plugin includes additional tools for managing the inference service, such as checking status and turning the NIM service on or off, enabling a user-friendly experience for both beginners and power users.
The goal of this plugin is to make generative image workflows faster, more accessible, and more fun—leveraging the strengths of NVIDIA’s hardware, AI models, and desktop ecosystem. By combining the power of FLUX with the voice-enabled G-Assist interface, the plugin turns any PC into a hands-free creative studio.
What Can It Do?
Image Generation
- Generate images from text prompts using Flux AI model
- Support for multiple backends: Local NIM servers, NVIDIA hosted services, or InvokeAI
- Automatic desktop background setting - generated images can be set as your wallpaper
- High-quality output with customizable parameters (resolution, steps, CFG scale)
NIM Server Management
- Start/stop local Flux NIM servers using WSL and Podman
- Check NIM server status to see if the service is running
- Health endpoint testing for local servers
- Automatic configuration using NGC API keys and Hugging Face tokens
InvokeAI Integration
- Upload screenshots to InvokeAI for image-to-image workflows
- Flux Kontext generation using uploaded images as reference
- Processor control - pause and resume InvokeAI processing queues
- VRAM management - empty model cache to free up memory
- Status monitoring - check InvokeAI service health and version
Smart Configuration
- Flexible URL configuration - works with local servers or NVIDIA hosted endpoints
- Automatic API key validation - ensures proper NVIDIA API key format
- Configurable output directories for generated images
- Board management for InvokeAI gallery organization
Example Commands
- "hey flux, generate an image of a cyberpunk city at night"
- "hey flux, start the Flux NIM server"
- "hey flux, use kontext to make it a cartoon style" (does image-to-image generation using latest screenshot taken with NVIDIA screenshot shortcut)
- "hey flux, empty the InvokeAI model cache to free up VRAM"
- "hey flux, Check if the NIM server is running"
Before You Start
Make sure you have:
- Windows PC
- Python 3.12 or higher
- G-Assist installed on your system
- pywin32 >= 223
- Basic knowledge of Python
💡 Tip: Use a virtual environment to keep your plugin dependencies isolated from other Python projects!
Installation Guide
Step 1: Get the Files
Clone this repository
This downloads the plugin code and all necessary files to your computer.
Step 2: Set Up Python Environment
Run the setup.bat file. This will take care of creating a Python virtual environment will install project dependencies.
python -m venv .venv
.venv\Scripts\activate
python -m pip install -r requirements.txt
Step 3: Build the project
Run build.bat to build the project. This script will also place the g-assist-plugin-flux.exe and manifest.json files in %PROGRAMDATA%\NVIDIA Corporation\nvtopps\rise\plugins\flux.
Step 4: Configuration
Copy the config.example.json file and rename it as config.json and place it in %PROGRAMDATA%\NVIDIA Corporation\nvtopps\rise\plugins\flux. Customize it with the appropriate configuration values (see below for configuration details). Here is an example configuration:
{
    "GALLERY_DIRECTORY": "E:\\NVIDIA",
    "FLUX_NIM_URL": "http://localhost:8000",
    "NGC_API_KEY": "xxxxxxxx",
    "HF_TOKEN": "hf_xxxxxxxx",
    "LOCAL_NIM_CACHE": "~/.cache/nim",
    "INVOKEAI_URL": "http://localhost:9090",
    "OUTPUT_DIRECTORY": "E:\\Flux"
}
Step 5: Set up Flux
Follow instructions here for installing the FLUX.1-dev model from Black Forest Labs using NVIDIA NIM on WSL. Be sure to do the following:
- follow instructions here: https://docs.nvidia.com/nim/wsl2/latest/getting-started.html for getting started with WSL
- use the NVIDIA NIM WSL2 Installer for configuring a new WSL environment configured with all of the required NVIDIA dependencies
- In your Hugging Face account read and accept FLUX.1-dev, FLUX.1-Canny-dev, FLUX.1-Depth-dev and FLUX.1-dev-onnx License Agreements and Acceptable Use Policy. You must accept the agreements/policies for all of the models even though this plugin does not directly use the Canny or Depth modes.
- Make sure to map port
8000in the NIM to port8000on the WSL host as shown in the setup link above.
Step 6: Install InvokeAI (optional)
InvokeAI has a Windows installer that can be found here: https://invoke-ai.github.io/InvokeAI/installation/quick_start/#step-2-download. Download the Flux models including the FLUX.1 Kontext dev (Quantized) model for using Flux Kontext in the Flux Plug-in for G-Assist. By default InvokeAI runs on http://localhost:9090.
Step 7: Start the NVIDIA NIM
Ask flux if this NIM is running. If it is not running, ask flux to start the NIM. This will run a command to start the NIM container in WSL using podman:
podman_cmd = [
    'wsl', '-d', 'NVIDIA-Workbench',
    'podman', 'run', '-d', '--rm', '--name=nim-server',
    '--device', 'nvidia.com/gpu=all',
    '-e', f'NGC_API_KEY={NGC_API_KEY}',
    '-e', f'HF_TOKEN={HF_TOKEN}',
    '-p', '8000:8000',
    '-v', f'{LOCAL_NIM_CACHE}:/opt/nim/.cache/',
    'nvcr.io/nim/black-forest-labs/flux.1-dev:1.0.0'
]
Then ask if the NIM is ready. This will check the /v1/health/live and /v1/health/ready endpoints of the Flux NIM.
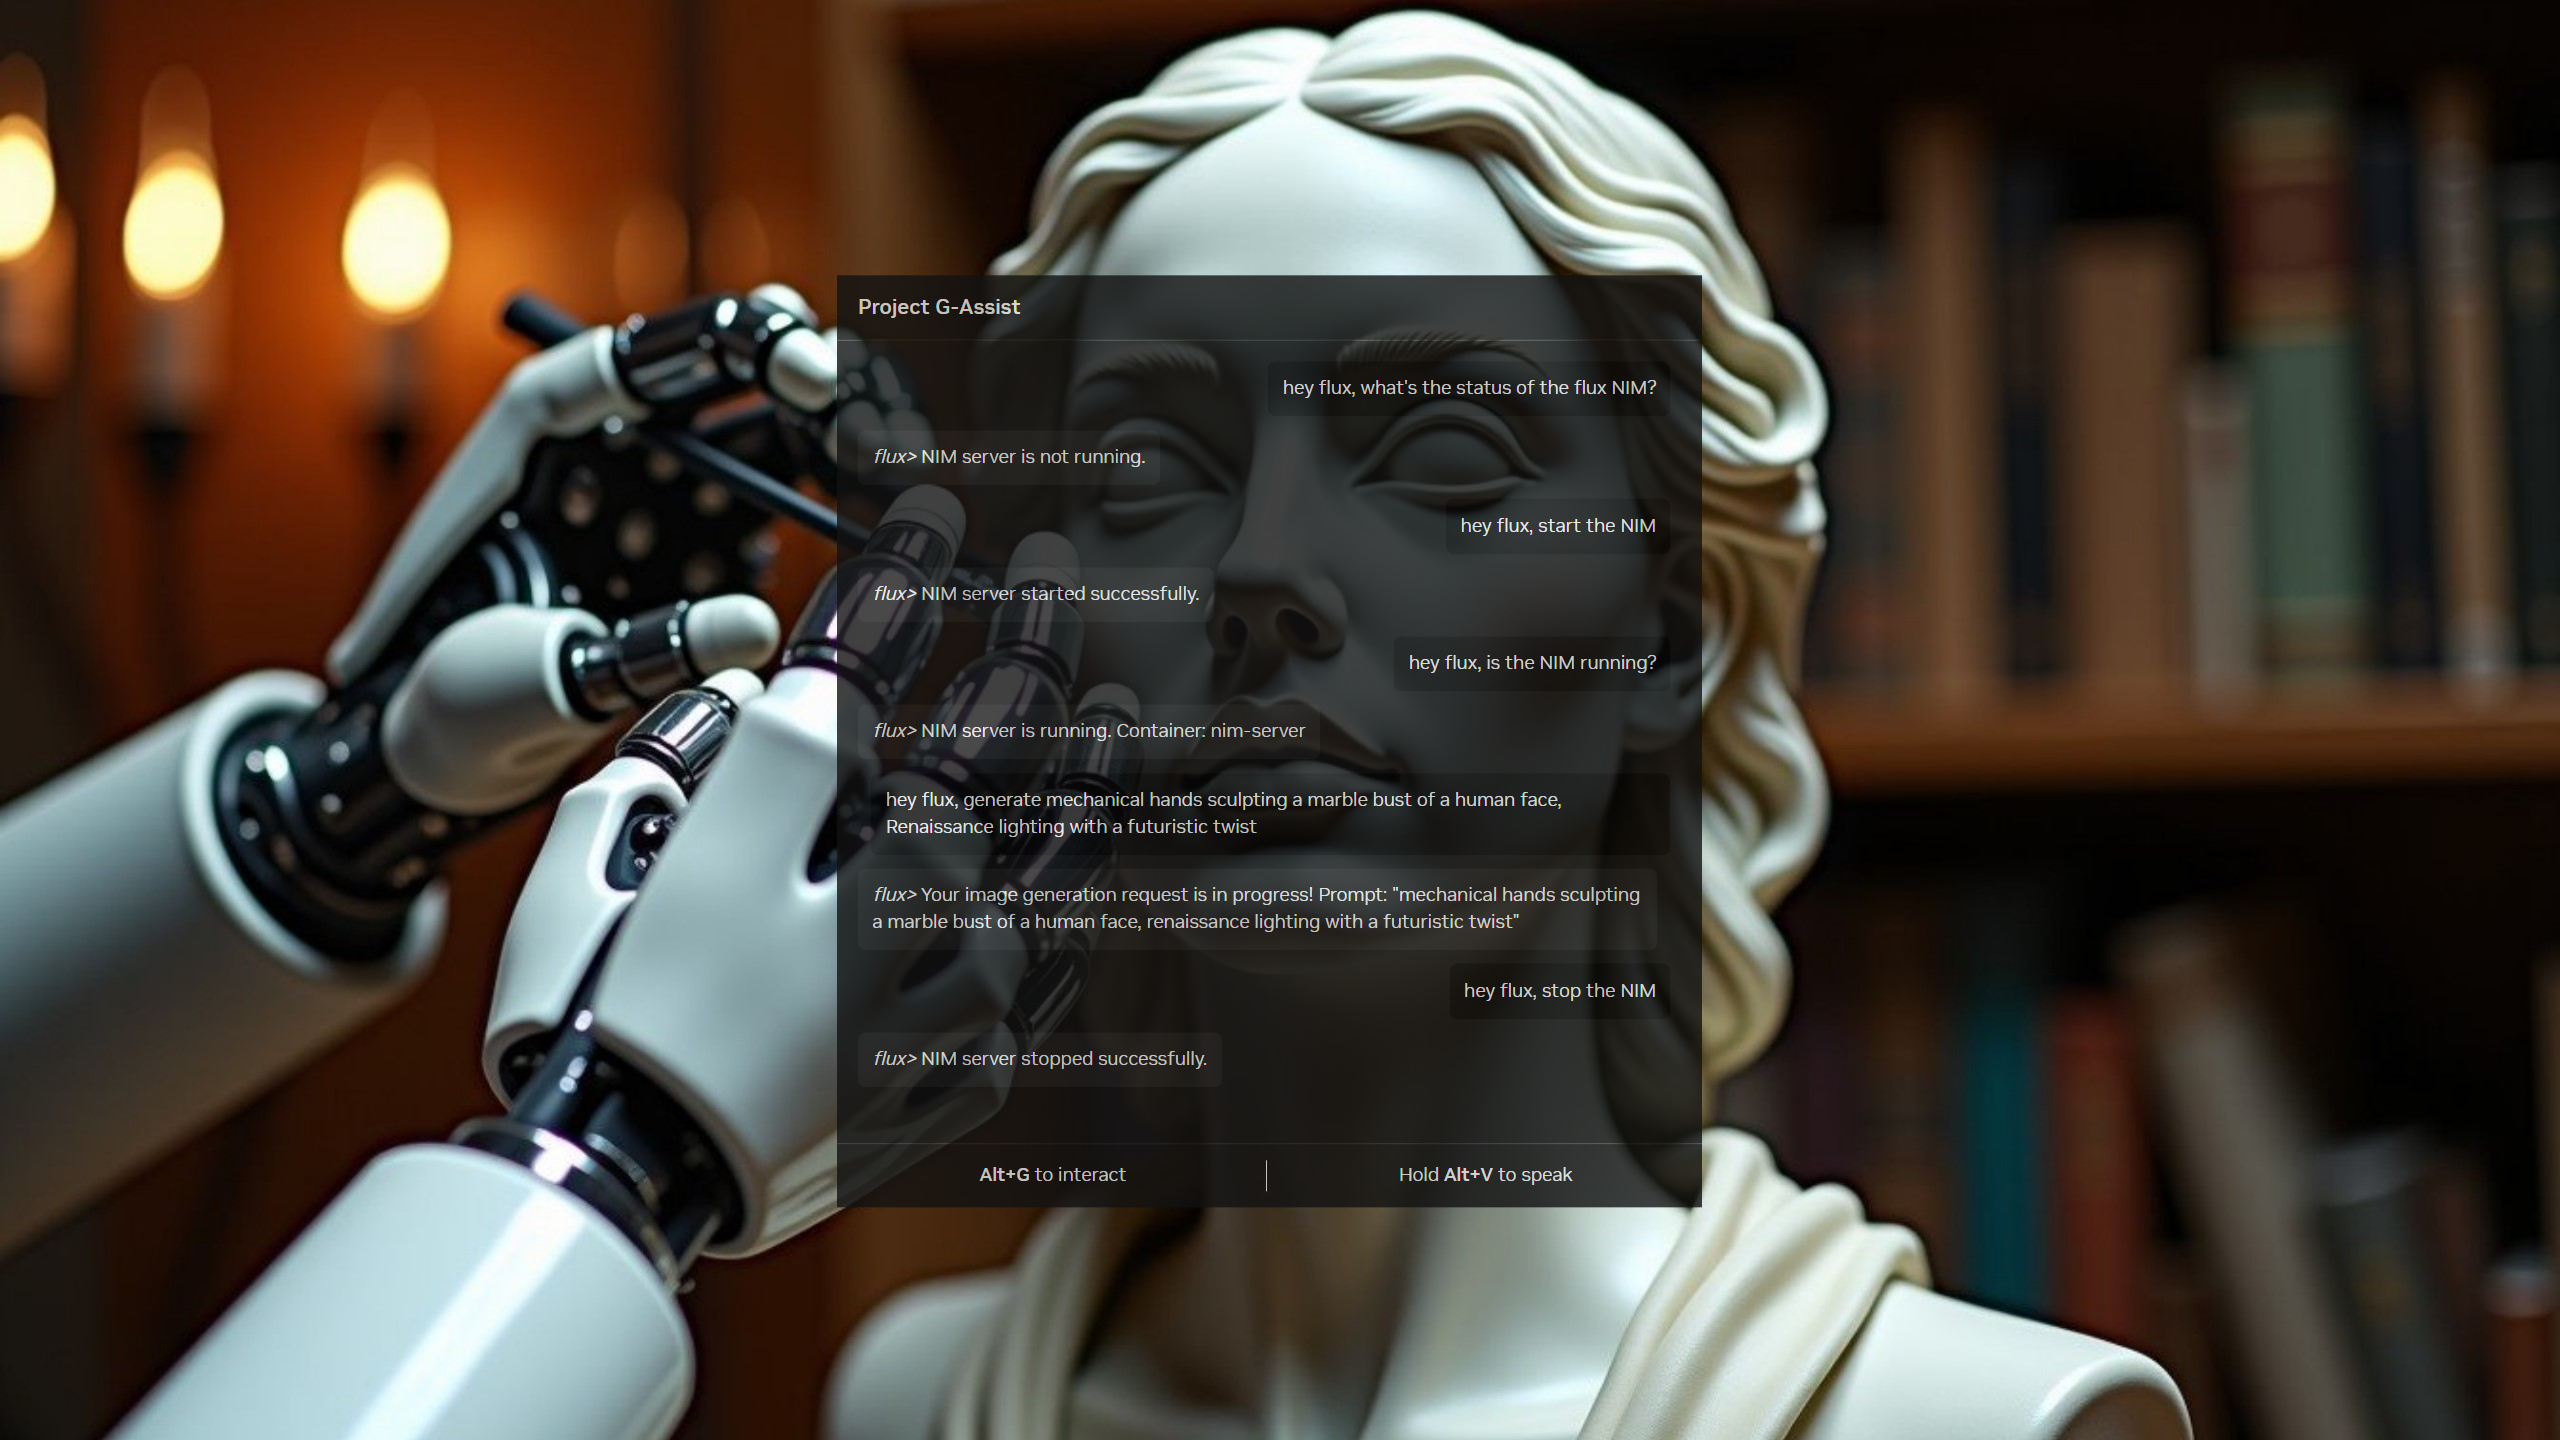
Step 8: Generate AI images using the Flux Plug-in in the G-Assist chat window
Send a message to G-Assist:
"hey flux, generate a cat piloting a spaceship"
The Flux Plug-in will respond with:
flux> Your image generation request is in progress! Prompt: "a cat piloting a spaceship"
When the image generation is complete you will find the image on your Desktop background, and the image will be saved to the output directory specified in your configuration file.
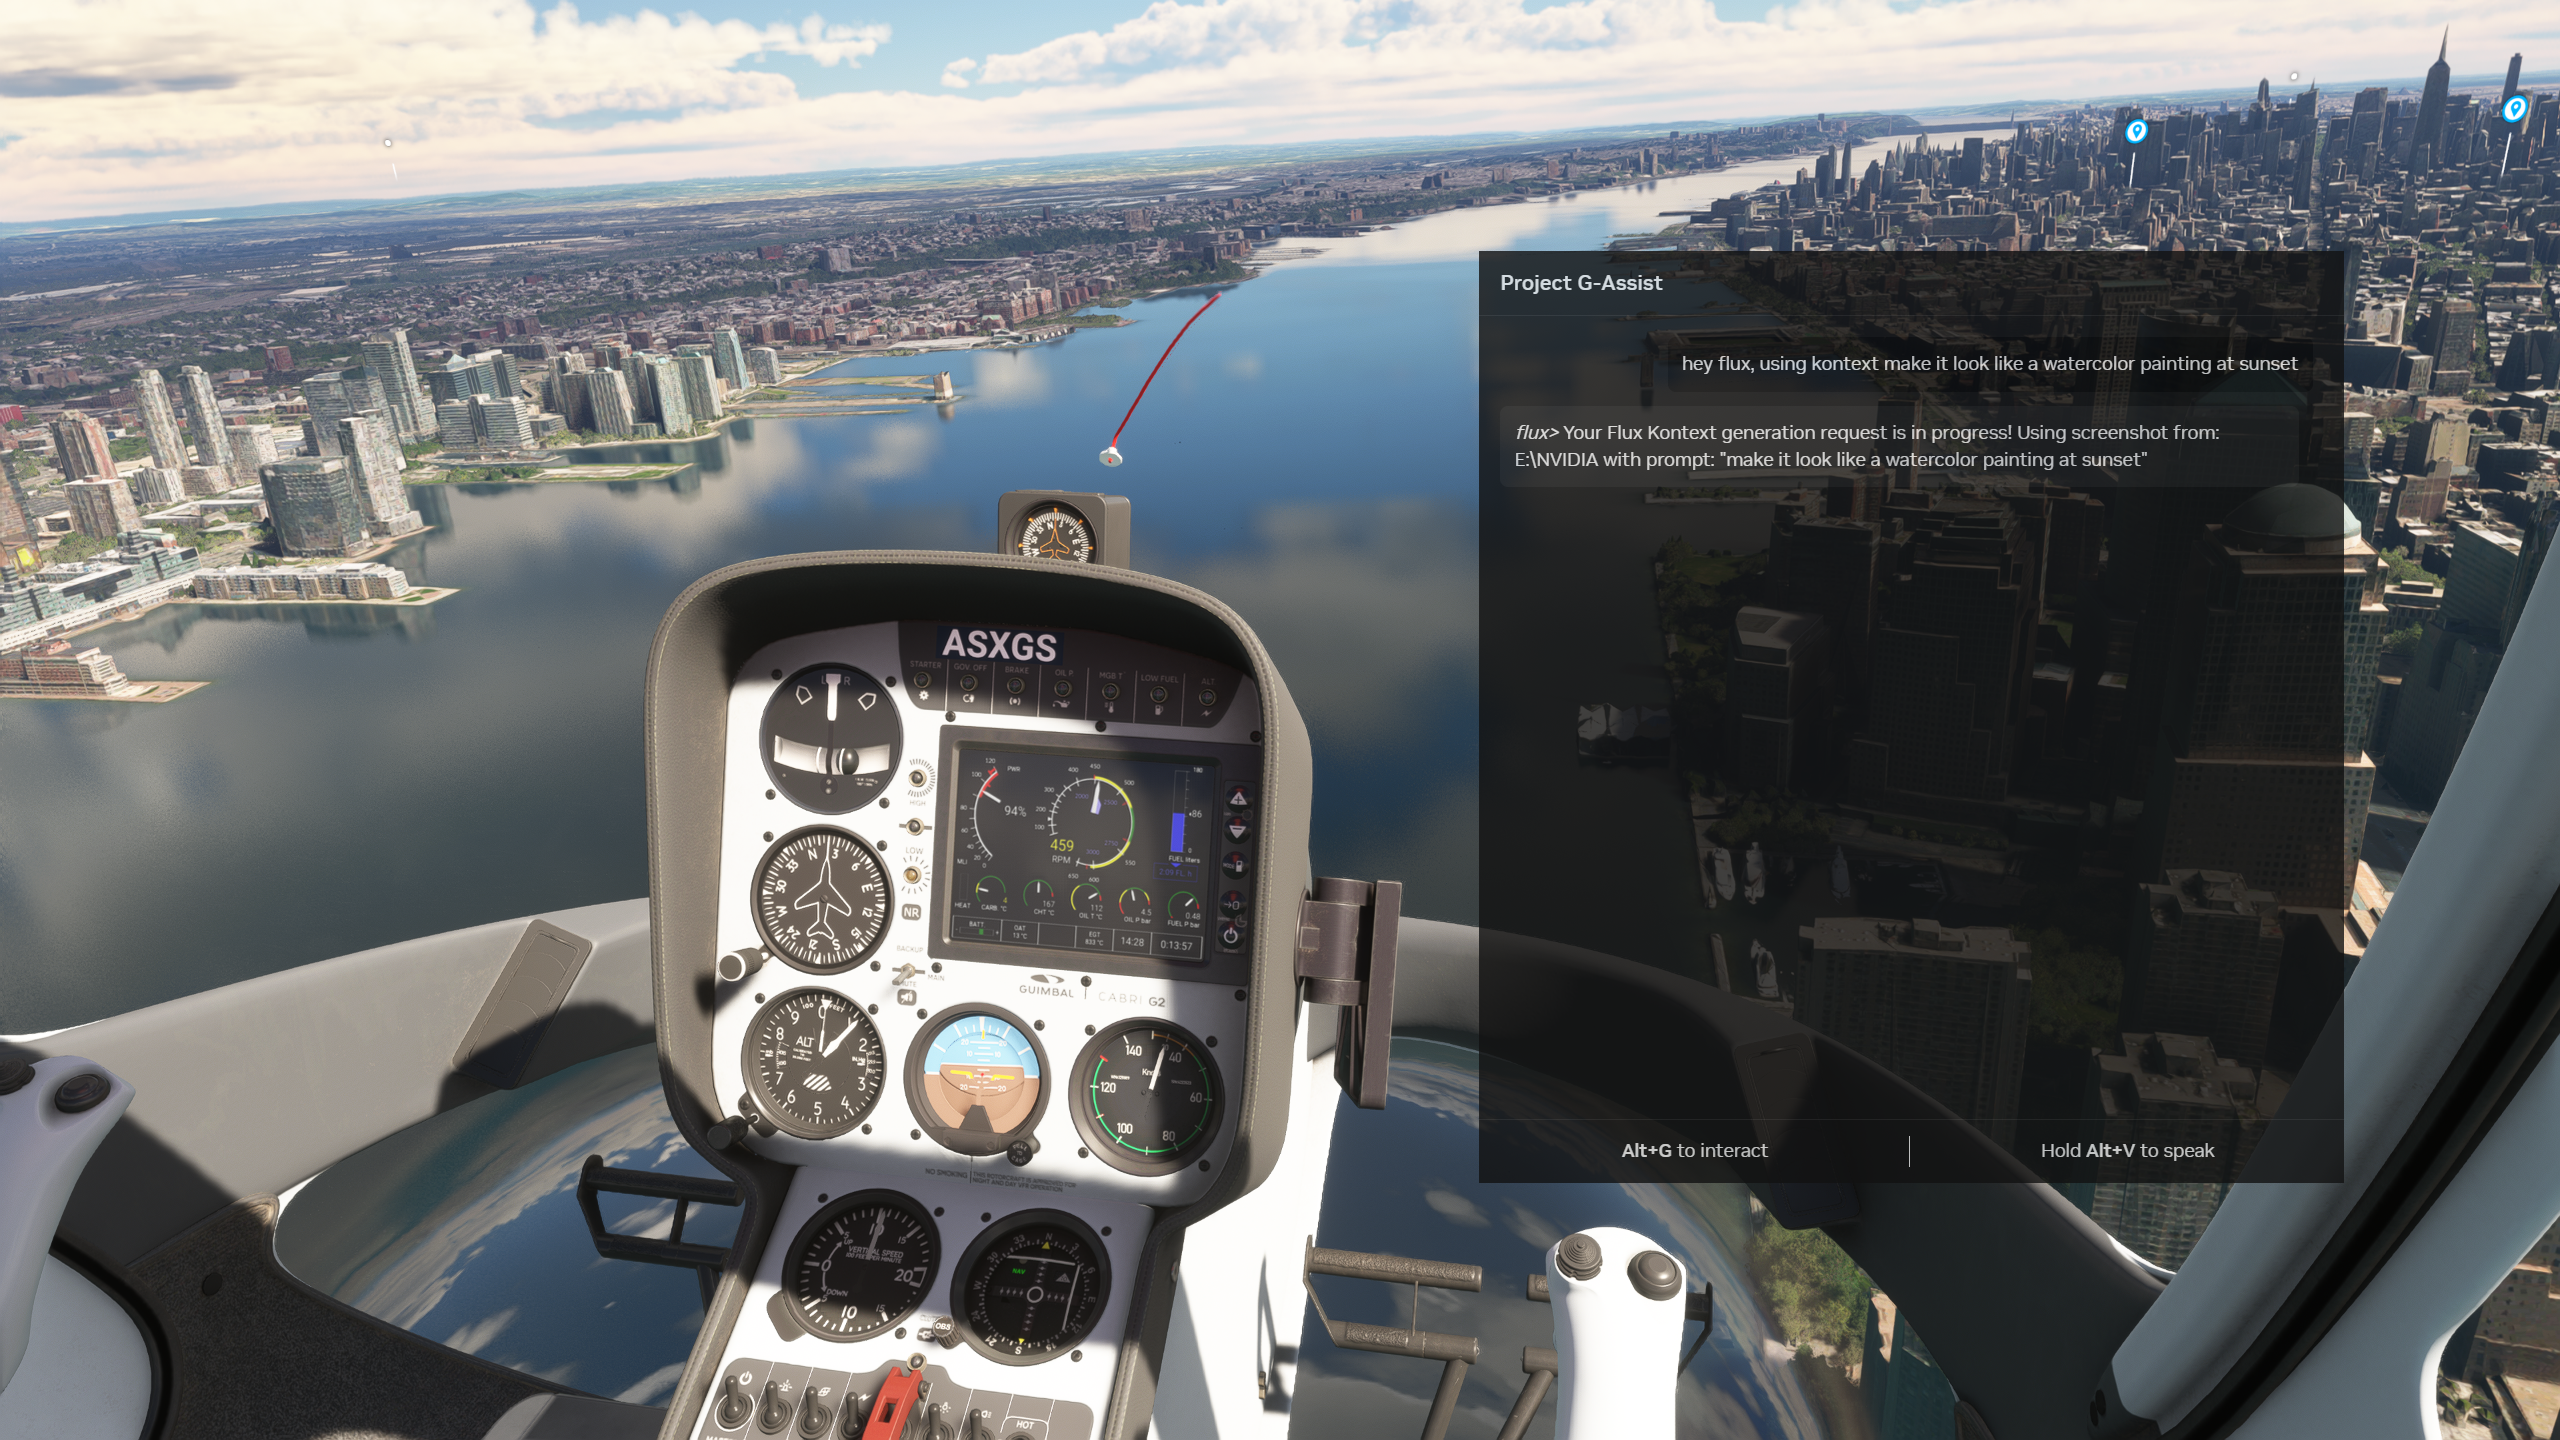
Step 9: Transform a screenshot with Flux Kontext
Take a screenshot using the NVIDIA Screenshot hotkey (usually Alt + F1), and then ask the Flux Plug-in to transform it to any style using Kontext.

hey flux, use kontext with the prompt: cartoon style

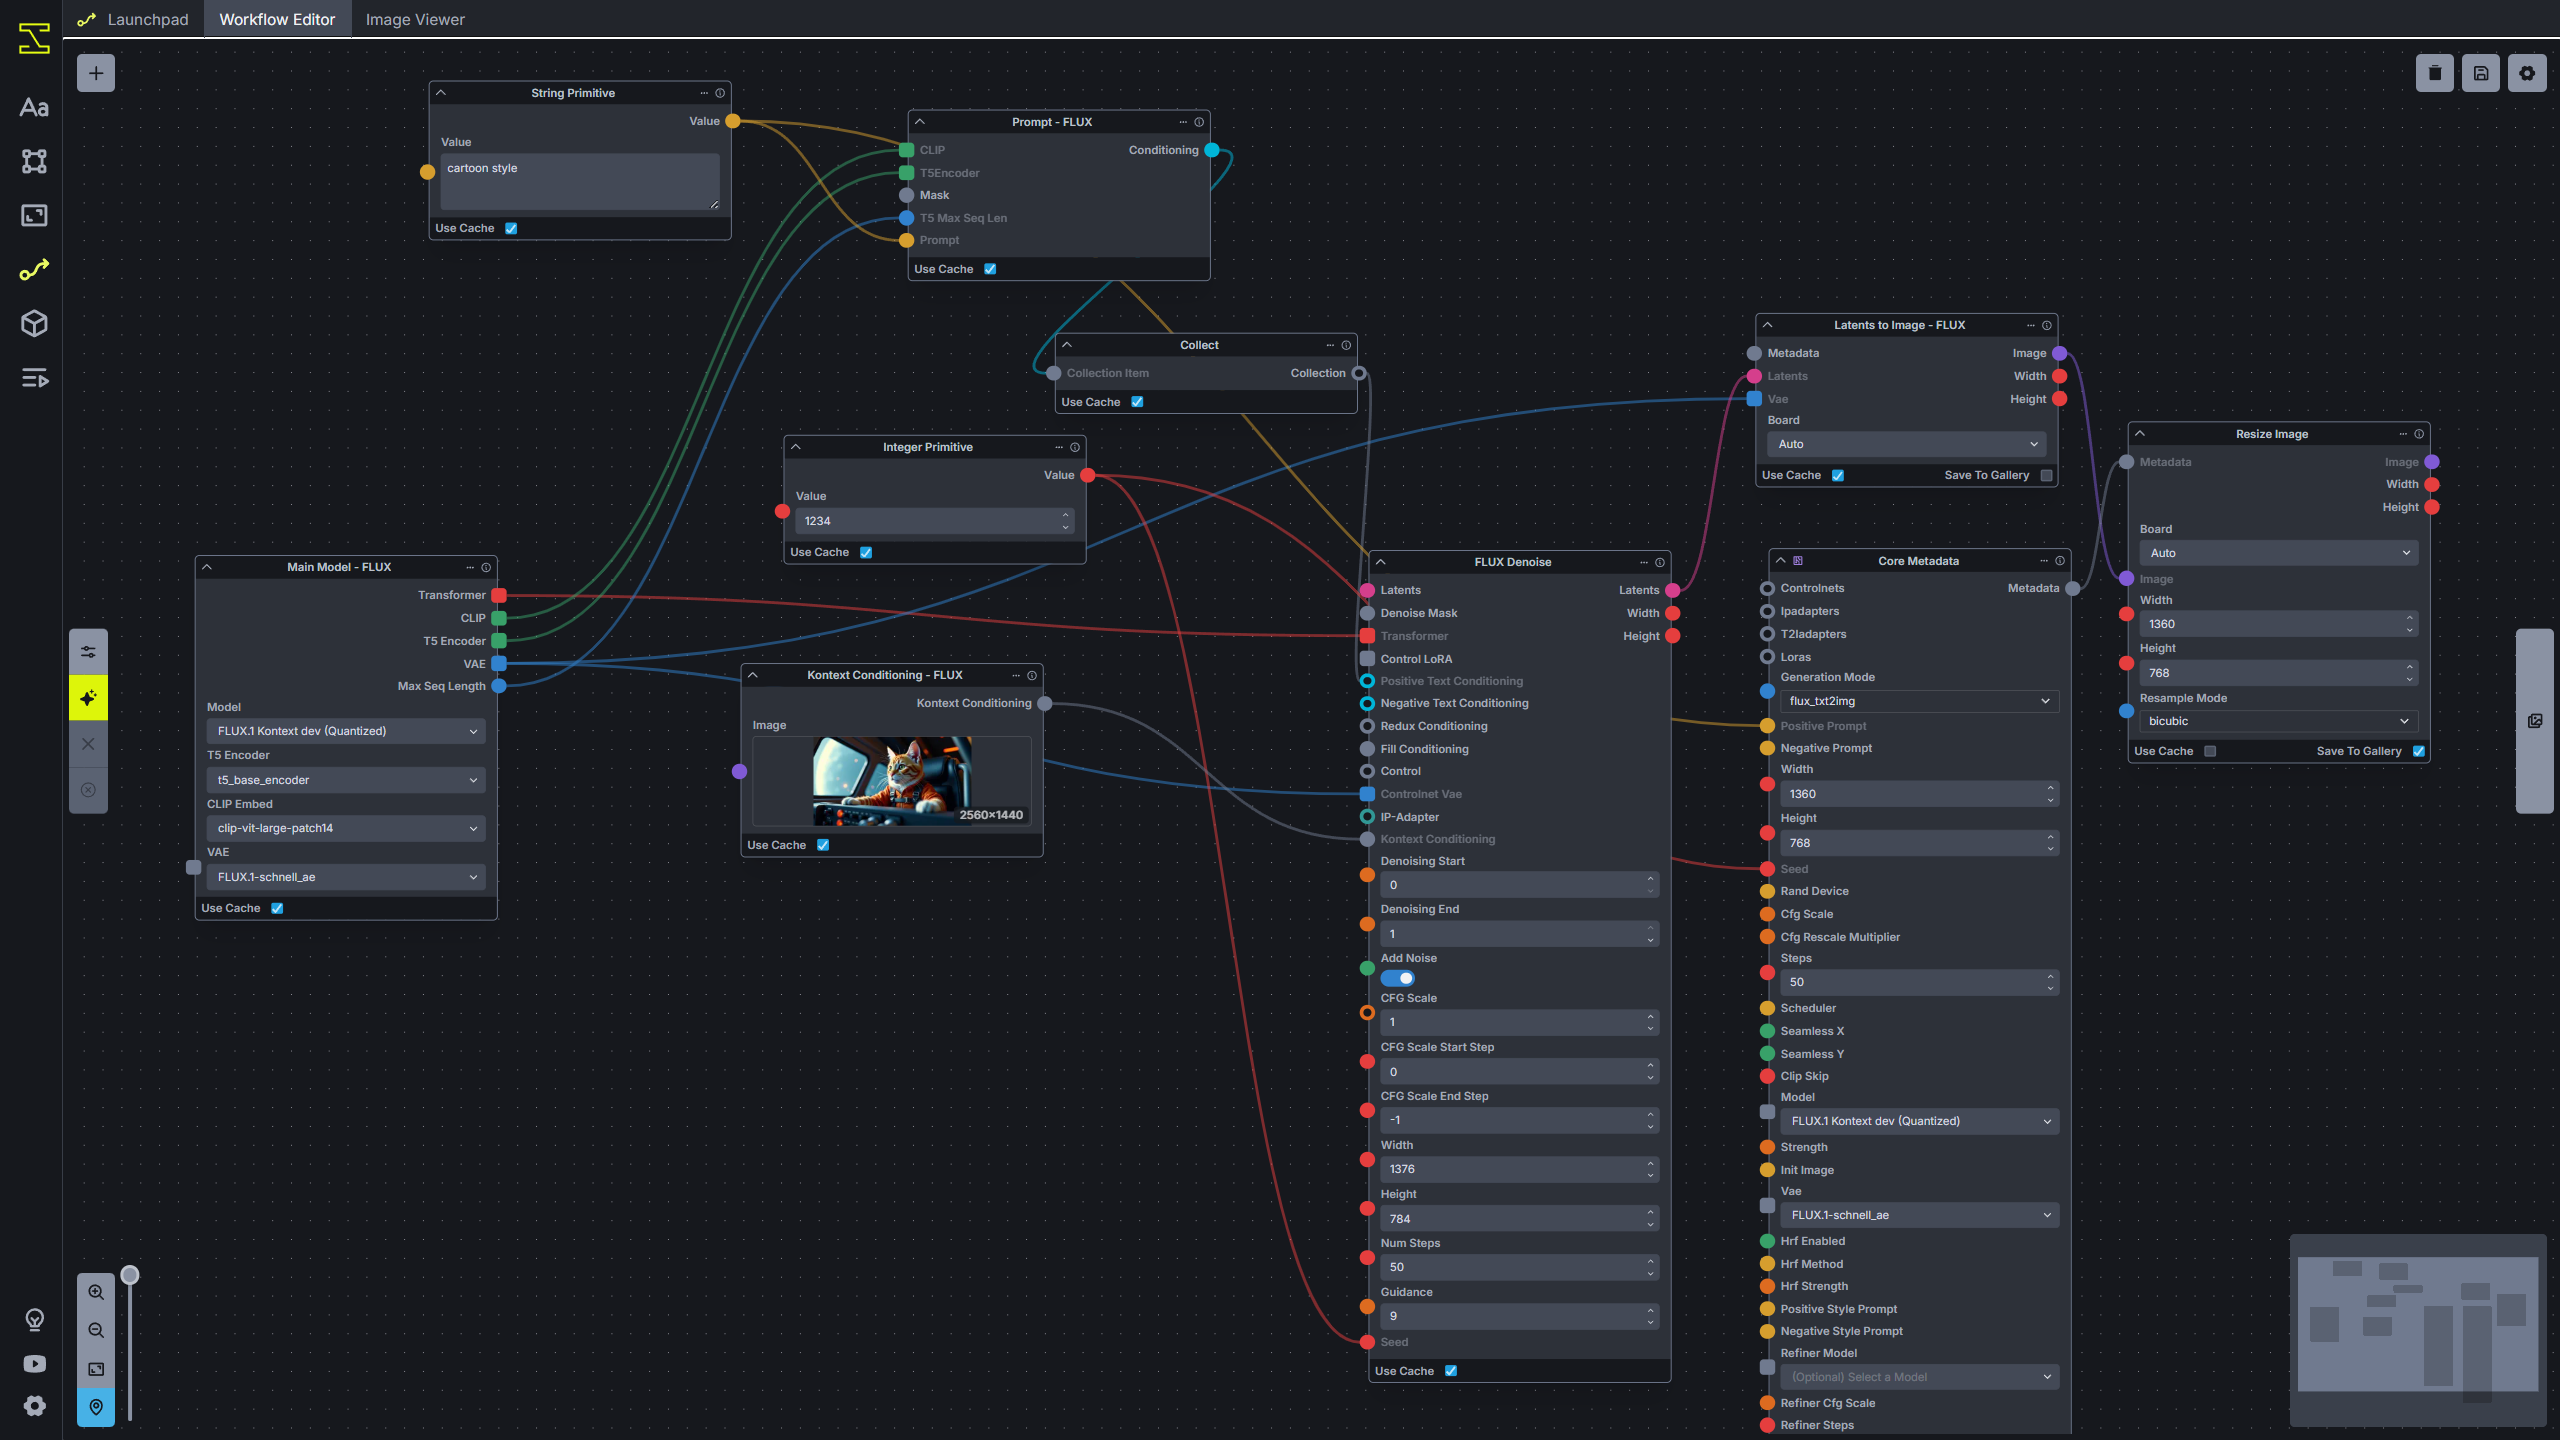
Flux does this by triggering an InvokeAI graph workflow. The generated image and the workflow can both be viewed in the InvokeAI UI:
You can ask the Flux Plug-in to pause/resume InvokeAI processing to avoid running Flux Kontext image generation while your GPU is busy with other tasks. Also you can ask flux to empty the model cache in order to free up VRAM on your GPU.
Configuration
The Flux plugin uses a config.json file to manage all settings. Copy config.example.json to config.json and customize the values for your setup.
Configuration Options
| Option | Example Values | Required |
|---|---|---|
GALLERY_DIRECTORY | "D:\\Screenshots", "C:\\NVIDIA" | No |
NVIDIA_API_KEY | "nvapi-your-key-here" | No* |
FLUX_NIM_URL | "http://localhost:8000", "http://192.168.1.100:8000" | Yes |
NGC_API_KEY | "your-ngc-key" | Yes** |
HF_TOKEN | "hf_your-token" | Yes** |
LOCAL_NIM_CACHE | ~/.cache/nim | Yes** |
INVOKEAI_URL | "http://localhost:9090", "http://192.168.1.100:9090" | No |
BOARD_ID | "my-gallery-board", "flux-gallery" | No |
OUTPUT_DIRECTORY | "C:\\GeneratedImages", "D:\\flux-output" | No |
*Required only when using NVIDIA hosted Flux service (FLUX_NIM_URL starts with "https://ai.api.nvidia.com")
**Required only when using local NIM server
Using the Flux.1-dev NVIDIA NIM for text-to-image generation

On NVIDIA GeForce RTX AI PCs, the best way to do AI image inference is by using NVIDIA NIMs. Windows currently has beta support for running NVIDIA NIMs in WSL with Podman (a program for running containers, similar to Docker).
NVIDIA provides an installer that installs a WSL distribution with all dependencies installed. You can find those resources here: https://docs.nvidia.com/nim/wsl2/latest/getting-started.html (WSL2 is required for hosting any NIM. Refer to the official NVIDIA NIM on WSL2 documentation for setup instructions.)
How It Works
You can request an image to be generated by simply saying something like:
"hey flux, generate a cat piloting a spaceship"
The Flux Plugin will make an API request to the Flux NIM URL (configured in your config.json, defaults to http://localhost:8000).
Asynchronous Processing
The G-Assist chat assistant has a timeout of 10 seconds, so the chat assistant returns immediately with:
flux> Your image generation request is in progress! Prompt: "a cat piloting a spaceship"
The image generation request runs on a separate thread, since the image generation process with the NVIDIA NIM can take up to 30 seconds (depending on the number of steps, 50 steps is used in the plugin for best results). The plugin then creates an image file from the base64 encoded image in the response from the Flux NIM server, and it sets this image as your desktop background image.
NIM Management
There are also commands for starting and stopping the Flux NIM, which runs Podman commands inside of the NVIDIA-Workbench WSL distribution:
- Start NIM: "hey flux, start the Flux NIM server"
- Stop NIM: "hey flux, stop the Flux NIM server"
- Check Status: "hey flux, check if the NIM server is running"
Configuration
Make sure your config.json includes the necessary credentials:
NGC_API_KEY: Your NVIDIA NGC API key for downloading modelsHF_TOKEN: Your Hugging Face token for model accessLOCAL_NIM_CACHE: Path to your local NIM cache directory
Image-to-image generation with Flux Kontext and InvokeAI
The Flux Plug-in supports image-to-image generation using an open source image generation tool called InvokeAI. This tool is similar to ComfyUI and it has solid API support.
Update: NVIDIA released the FLUX.1 Kontext dev NIM microservice in August 2025, which can be used instead of InvokeAI for image-to-image workflows! The NIM version offers optimized performance with quantization reducing VRAM requirements from 24GB to 12GB (FP8 on Ada Generation GPUs) and 7GB (FP4). Check the NVIDIA blog announcement for details.
You can interact with the InvokeAI program in a few different ways:
Screenshot-based Image Generation
- Upload your latest screenshot and perform image-to-image generation using Flux Kontext. This allows you to apply any type of manipulation to your screenshot (for example, you can say "hey flux, use kontext to make it in the style of a cartoon")
- The plugin automatically finds your most recent screenshot and uploads it to InvokeAI
- You can provide custom prompts to guide the transformation process
Processing Control
- Pause or resume processing: This is useful if you are playing a GPU intensive game. You can pause processing, but still submit image-to-image generation tasks using Flux Kontext. The tasks will be queued and they can be resumed later when your GPU is not busy with other tasks.
- Monitor the processing queue status and control when generation happens
Memory Management
- Empty the model cache: InvokeAI keeps models cached between generation, but you can empty the model cache by simply telling it to do so
- This helps free up VRAM when you're not actively using InvokeAI
- Useful for switching between different AI workloads or when playing games
Setup Requirements
To use the image-to-image features, you'll need:
- InvokeAI installed and running locally (typically on
http://localhost:9090) - Flux Kontext model loaded in InvokeAI
- Proper configuration in your
config.jsonfile
Supported Commands
The Flux Plug-in for G-Assist supports the following commands:
| Function | Description | Example |
|---|---|---|
flux_nim_ready_check | Tests health endpoints of the Flux NIM server | "hey flux, check if the flux nim server is ready" |
check_nim_status | Checks if the Flux NIM server is running | "hey flux, check if the nim server is running" |
stop_nim | Stops the Flux NIM server | "hey flux, stop the flux nim server" |
start_nim | Starts the Flux NIM server | "hey flux, start the flux nim server" |
generate_image | Generates an image from text prompt using Flux | "hey flux, generate an image of a cyberpunk city" |
generate_image_using_kontext | Performs image-to-image generation using Flux Kontext | "hey flux, use kontext to make it a cartoon style" |
invokeai_status | Checks the status of the InvokeAI service | "hey flux, check invokeai status" |
pause_invokeai_processor | Pauses the InvokeAI processing queue | "hey flux, pause the invokeai processor" |
resume_invokeai_processor | Resumes the InvokeAI processing queue | "hey flux, resume the invokeai processor" |
invokeai_empty_model_cache | Empties the InvokeAI model cache to free VRAM | "hey flux, empty the invokeai model cache" |
Logging
Your plugin automatically logs to flux_plugin.log in your user's profile directory. It tracks:
- Plugin startup and shutdown
- Command reception and processing
- Error conditions
- Function execution details
Troubleshooting Tips
- Plugin not starting? Check if Python 3.12+ is installed and in PATH
- Communication errors? Verify pywin32 is installed correctly
- Commands not working? Double-check your command registration
- Missing logs? Ensure write permissions in user profile directory
Want to Contribute?
We'd love your help making this template even better! Check out CONTRIBUTING.md for guidelines on how to contribute.
License
This project is licensed under the Apache License 2.0 - see the LICENSE file for details.
Hardware
The Flux Plug-in for G-Assist was developed and tested on a PC with a GeForce RTX 4090 GPU.